---
url: /guide/start/introduction.md
---
import compare from '../../../public/compare.png';
import rspackAudio from '../../../public/rspack.mp3';
# Introduction
Rspack (pronounced as `/'ɑrespæk/`,
) is a high performance JavaScript bundler written in Rust. It offers strong compatibility with the webpack ecosystem, allowing for seamless replacement of webpack, and provides lightning fast build speeds.
## Why Rspack?
Rspack was initially created to solve performance problems encountered at ByteDance, a tech company that maintains many large monolithic app projects with complex bundling requirements. Production build times had grown to ten minutes or even half an hour in some cases, and cold start times could exceed several minutes. After experimenting with many bundlers and optimization ideas, a common set of requirements emerged:
- **Dev mode startup performance.** `npm run dev` is a command that developers may invoke many times per hour. Engineering productivity suffers if startup time exceeds 10-15 seconds.
- **Fast builds.** `npm run build` is used in CI/CD pipelines and directly impacts merging productivity and application delivery time. Large applications may spend 20-30 minutes running these pipelines, and bundling time is often a major contributor.
- **Flexible configuration.** From experimenting with various popular bundlers, we found that one-size-fits-all configurations encountered many problems when trying to accommodate real world projects. A major advantage of webpack is its flexibility and ease of accommodating customized requirements for each project. That same flexibility means legacy projects often face steep migration costs when moving away from webpack.
- **Production optimization capabilities.** All of the existing bundling solutions also had various limitations when optimizing for a production environment, such as insufficiently fine-grained code splitting. Rspack has an opportunity to rethink these optimizations from the ground up, leveraging Rust-specific features such as multithreading.
## Current status of Rspack
As of August 2024, we have released [Rspack 1.0](/blog/announcing-1-0), which we consider production-ready because it covers most of webpack's APIs and features.
Rspack is currently compatible with almost all loaders in the community. For the 50 most downloaded [webpack plugins](/guide/compatibility/plugin), more than 85% can be used in Rspack or have an alternative.
:::tip Learn more
- See [Rspack blogs](/blog/index) for the latest updates on Rspack.
- See [Roadmap](/misc/planning/roadmap) for the future plans of Rspack.
:::
## Comparisons with other tools
### Compared with webpack
[webpack](https://webpack.js.org/) is perhaps the most mature modern bundler, with an active ecosystem, flexible configuration, and rich features.
- **Rust language efficiency:** webpack's competitors frequently challenge it based on performance, especially for larger projects. Rspack solves this using the Rust language, which was specifically designed to prioritize performance, topping benchmarks for both speed and memory management. Rust also provides many compiler safeguards to avoid common pitfalls of other native languages such as C++.
- **Highly parallelized architecture:** webpack is limited by JavaScript's weak support for multithreading. By contrast, Rspack's native code takes full advantage of modern multi-core CPUs.
- **Built-in implementations of essential bundling features:** webpack's hook system famously enables a vast landscape of loaders and plugins contributed by the community. Unfortunately these third-party packages can frequently lead to performance bottlenecks, sometimes because the authors did not have deep knowledge of webpack internals, and sometimes because the hook system by nature limits how algorithms can interact. Rspack provides built-in plugins for key features to improve performance.
- **Optimized hot module replacement (HMR):** No matter how large your project is, ensuring a great experience for HMR places even steeper demands on build times than ordinary bundling. Rspack incorporates a specialized incremental compilation strategy to address this requirement.
### Compared with Vite
[Vite](https://vitejs.dev/) offers a great developer experience, but its reliance on [Rollup](https://rollupjs.org/) for production builds faces similar performance costs to other JavaScript-based approaches. The same tradeoffs of webpack versus Rollup also apply, such as missing flexibility from the [optimization.splitChunks](/config/optimization#optimizationsplitchunks) feature.
### Compared with esbuild
[esbuild](https://esbuild.github.io/) achieves very good performance by implementing nearly all operations in Golang except for some JavaScript plugins. However, esbuild's feature set is not as complete as webpack, for example missing HMR and [optimization.splitChunks](/config/optimization#optimizationsplitchunks) features.
### Compared with Turbopack
Turbopack is implemented in Rust like Rspack, but Turbopack started over with a redesigned architecture and configuration. This brings some benefits, but presents a steeper migration cost for projects that rely on webpack and its extensive ecosystem.
### Compared with Rollup
Rspack and Rollup are both bundling tools, but they focus on different areas. Rollup is more suitable for bundling libraries, while Rspack is more suitable for bundling applications. Therefore, Rspack has optimized many features for bundling applications, such as HMR and bundle splitting. Rollup produces ESM outputs that are more friendly to libraries than Rspack. There are also many tools in the community that encapsulate Rollup to some extent and provide more friendly support for bundling applications, such as Vite. Currently, Rspack has better production build performance than Rollup.
### Compared with Parcel
The overall architecture of Rspack shares many similarities with [Parcel](https://parceljs.org/). For example, both treat CSS assets as built-in supported modules and both support filter-based transformers. However, Parcel focuses more on out-of-the-box usability, while Rspack focuses more on providing flexible configuration for higher-level frameworks and tools. Parcel introduced features like the Unified Graph and built-in HTML support. Rspack also plans to support these features in the future.
## Next steps
Please read [Quick start](/guide/start/quick-start) to start using Rspack.
Welcome to the [GitHub Discussions](https://github.com/web-infra-dev/rspack/discussions) and [Discord](https://discord.gg/sYK4QjyZ4V) to communicate with us.
---
url: /guide/start/quick-start.md
---
import { PackageManagerTabs } from '@theme';
# Quick start
Get up to speed quickly with a new Rspack based project.
- [Create a new project](#create-a-new-project): Use the CLI to create a brand-new Rspack or Rsbuild project.
- [Migrating from existing projects](#migrating-from-existing-projects): Migrate from a webpack-based project to Rspack.
## Ecosystem
As a low-level bundler, Rspack has a rich ecosystem that includes various frameworks, tools, and solutions. These ecosystem projects cover different aspects from frameworks to development tools, meeting diverse development needs across scenarios and providing an out-of-the-box experience.
See the [Ecosystem](/guide/start/ecosystem) page to explore these ecosystem projects.
## Environment preparation
Rspack supports using [Node.js](https://nodejs.org/), [Deno](https://deno.com/), or [Bun](https://bun.sh/) as the JavaScript runtime.
You can refer to the following installation guides and choose one runtime:
- [Install Node.js](https://nodejs.org/en/download)
- [Install Bun](https://bun.com/docs/installation)
- [Install Deno](https://docs.deno.com/runtime/getting_started/installation/)
:::tip Version requirements
Rspack has the following Node.js version requirements:
- `@rspack/cli >= v1.0.0` requires Node.js 18.12.0 or higher.
- `@rspack/core >= v1.5.0` requires Node.js 18.12.0 or higher.
- `@rspack/core < v1.5.0` requires Node.js 16.0.0 or higher.
:::
## Create a new project
### Using Rsbuild
Rsbuild is a high-performance build tool powered by Rspack and developed by the Rspack team. It provides a set of thoughtfully designed default build configs, offering an out-of-the-box development experience and can fully unleash the performance advantages of Rspack.
We recommend using [Rsbuild](https://rsbuild.rs/) to create new projects, simply run the following command:
> For more information, refer to [Rsbuild - Quick start](https://rsbuild.rs/guide/start/quick-start).
### Using Rspack CLI
Rspack CLI is a tool comparable to webpack CLI, offering the basic `serve` and `build` commands.
Run the following command to create an Rspack CLI project:
Then follow the prompts in your terminal.
### Non-interactive mode
[create-rspack](https://www.npmjs.com/package/create-rspack) and [create-rsbuild](https://www.npmjs.com/package/create-rsbuild) support a non-interactive mode through command-line options. This mode lets you skip all prompts and create a project directly, which is useful for scripts, CI, and coding agents.
For example, the following command creates a React app in the `my-app` directory:
```bash
# Rspack CLI
npx -y create-rspack --dir my-app --template react
# Rsbuild
npx -y create-rsbuild --dir my-app --template react
# Using abbreviations
npx -y create-rsbuild -d my-app -t react
```
## Online examples
We provide an online example based on Rsbuild. The example gives an intuitive feel for the build performance of Rspack and the development experience of Rsbuild:
- [Rsbuild CodeSandbox example](https://codesandbox.io/p/github/rstackjs/rsbuild-codesandbox-example)
Here we also provide an online example based on Wasm and WebContainer on StackBlitz:
- [Rsbuild StackBlitz Example](https://stackblitz.com/~/github.com/rstackjs/rsbuild-stackblitz-example)
## Manual installation
Start by creating a project directory and generating an npm `package.json':
```bash
mkdir rspack-demo
cd rspack-demo
npm init -y
```
Then installing [@rspack/core](https://www.npmjs.com/package/@rspack/core) and [@rspack/cli](https://www.npmjs.com/package/@rspack/cli) as dev dependencies:
Update your build scripts to use Rspack CLI:
```js title="package.json"
{
"scripts": {
"dev": "rspack dev",
"build": "rspack build",
"preview": "rspack preview"
}
}
```
Next, see [Configure Rspack](/config/index) to learn about how to configure Rspack.
## Migrating from existing projects
If you need to migrate from an existing project to Rspack, you can refer to the following guides:
- [Migrating from webpack to Rspack](/guide/migration/webpack)
- [Migrating from webpack to Rsbuild](https://rsbuild.rs/guide/migration/webpack)
- [Migrating from Create React App to Rsbuild](https://rsbuild.rs/guide/migration/cra)
- [Migrating from Vue CLI to Rsbuild](https://rsbuild.rs/guide/migration/vue-cli)
- [Migrating from Vite to Rsbuild](https://rsbuild.rs/guide/migration/vite)
- [Migrating from Tsup to Rslib](https://rslib.rs/guide/migration/tsup)
- [Migrating from Storybook](/guide/migration/storybook)
## Install canary version
When you need to test or verify the features of Rspack that are not yet released to the stable version, you may need to use the canary version.
The canary version of Rspack has a `-canary` suffix in the package scope. For example, the canary package name of `@rspack/core` is `@rspack-canary/core`. To use these versions, you can configure the overrides of the package manager (npm/yarn/pnpm/bun).
Here is an example of using pnpm overrides:
```json title="package.json"
{
"pnpm": {
"overrides": {
"@rspack/core": "npm:@rspack-canary/core@latest"
},
"peerDependencyRules": {
"allowAny": ["@rspack/*"]
}
}
}
```
Rspack community also provides [install-rspack](https://github.com/rstackjs/install-rspack) tool to easily install canary version:
```shell
npx install-rspack --version latest # Install the latest version
npx install-rspack --version canary # Install the canary version
npx install-rspack --version 1.0.0-canary-d614005-20250101082730 # Install the specified canary version
```
---
url: /guide/start/ecosystem.md
---
import { Tag } from '@components/Tag';
# Ecosystem
## Rstack
Rstack is a unified JavaScript toolchain centered on Rspack, with high performance and consistent architecture.
### Rsbuild
Build tool
[Rsbuild](https://github.com/web-infra-dev/rsbuild) is a high-performance build tool powered by Rspack. It provides a set of thoughtfully designed default build configs, offering an out-of-the-box development experience and can fully unleash the performance advantages of Rspack.
### Rslib
Library development tool
[Rslib](https://github.com/web-infra-dev/rslib) is a library development tool based on Rsbuild, which reuses the carefully designed build configuration and plugin system of Rsbuild. It allows developers to create JavaScript libraries in a simple and intuitive way.
### Rspress
Static site generatorReact
[Rspress](https://github.com/web-infra-dev/rspress) is a static site generator based on Rsbuild, React and MDX. It comes with a default documentation theme, and you can quickly build a documentation site with Rspress. You can also customize the theme to meet your personalized static site needs, such as blog sites, product homepages, etc.
### Rsdoctor
Build analyzer
[Rsdoctor](https://github.com/web-infra-dev/rsdoctor) is a build analyzer that can visually display the build process, such as compilation time, code changes before and after compilation, module reference relationships, duplicate modules, etc.
### Rstest
Testing framework
[Rstest](https://github.com/web-infra-dev/rstest) is a testing framework powered by Rspack. It delivers comprehensive, first-class support for the Rspack ecosystem, enabling seamless integration into existing Rspack-based projects.
### Rslint
Linter
[Rslint](https://github.com/web-infra-dev/rslint) is a high-performance JavaScript and TypeScript linter based on typescript-go. It offers strong compatibility with the ESLint and TypeScript-ESLint ecosystem, allowing for seamless replacement, and provides lightning-fast linting speeds.
## Community integrations
### Angular Rspack
Build toolAngular
[Angular Rspack](https://github.com/nrwl/angular-rspack) is a set of plugins and tools to make it easy and straightforward to build Angular applications with Rspack and Rsbuild.
### Docusaurus
Static site generatorReact
[Docusaurus](https://docusaurus.io/) is a static site generator for building, deploying, and maintaining open source project websites easily.
Docusaurus supports Rspack as the bundler since v3.6, see [Docusaurus Faster](https://docusaurus.io/blog/releases/3.6#docusaurus-faster) for details.
### Modern.js
Web frameworkReact
[Modern.js](https://modernjs.dev/en/) is a Rsbuild-based progressive React framework that supports nested routes, SSR, and provides out-of-the-box CSS solutions such as styled components and Tailwind CSS.
### Next.js
Web frameworkReact
[Next.js](https://nextjs.org/) is a React framework for building full-stack web applications. You use React Components to build user interfaces, and Next.js for additional features and optimizations.
Rspack team and Next.js team have partnered to provide the `next-rspack` plugin. This plugin allows you to use Rspack as the bundler for Next.js, see [Next.js guide](/guide/tech/next) for details.
### Nuxt
Web frameworkVue
[Nuxt](https://nuxt.com/) is a free and open-source framework with an intuitive and extendable way to create type-safe, performant and production-grade full-stack web applications and websites with Vue.js.
Nuxt v3.14 introduces a new first-class Nuxt builder for Rspack, see [Nuxt 3.14](https://nuxt.com/blog/v3-14) for details.
### Nx
Build systemMonorepo
[Nx](https://nx.dev/) is a powerful open-source build system that provides tools and techniques for enhancing developer productivity, optimizing CI performance, and maintaining code quality.
Rspack team and Nx team have collaborated to provide the [Rspack Nx plugin](https://nx.dev/nx-api/rspack). This plugin contains executors, generators, and utilities for managing Rspack projects in an Nx Workspace.
### Rspeedy
Build toolLynx
[Rspeedy](https://lynxjs.org/rspeedy/) is an Rspack-based build tool designed specifically for Lynx applications. [Lynx](https://lynxjs.org/) is a family of technologies empowering developers to use their existing web skills to create truly native UIs for both mobile and web from a single codebase.
### Re.Pack
Build toolReact Native
[Re.Pack](https://github.com/callstack/repack) is a build tool for building your React Native application.
Re.Pack v5 uses Rspack and React Native community CLI's plugin system to allow you to bundle your application using Rspack and easily switch from Metro.
### Storybook
UI development
[Storybook Rsbuild](https://storybook.rsbuild.rs/) allows you to use Rsbuild as the build tool for Storybook, and provides UI framework integrations like React and Vue.
## More
Visit [awesome-rstack](https://github.com/rstackjs/awesome-rstack) to discover more projects within the Rspack ecosystem.
---
url: /guide/start/ai.md
---
import { PackageManagerTabs } from '@theme';
# AI
To help AI better understand Rspack's features, configuration, and best practices so it can provide more accurate assistance during day-to-day development and troubleshooting, Rspack provides the following capabilities:
- [Agent Skills](#agent-skills)
- [llms.txt](#llmstxt)
- [Markdown docs](#markdown-docs)
- [AGENTS.md](#agentsmd)
## Agent Skills
Agent Skills are domain-specific knowledge packs that can be installed into Agents, enabling them to give more accurate and professional suggestions or perform actions in specific scenarios.
In the [rstackjs/agent-skills](https://github.com/rstackjs/agent-skills) repository, there are many skills for the Rstack ecosystem. The skills related to Rspack include:
- [rspack-best-practices](https://github.com/rstackjs/agent-skills#rspack-best-practices): Best practices for Rspack.
- [rspack-v2-upgrade](https://github.com/rstackjs/agent-skills#rspack-v2-upgrade): Upgrade an existing Rspack 1.x project to v2.
- [rspack-debugging](https://github.com/rstackjs/agent-skills#rspack-debugging): Debug crashes or deadlocks/hangs in the Rspack build process using LLDB.
- [rspack-tracing](https://github.com/rstackjs/agent-skills#rspack-tracing): Diagnose Rspack build failures or performance bottlenecks.
In Coding Agents that support skills, you can use the [skills](https://www.npmjs.com/package/skills) package to install a specific skill with the following command:
After installation, simply use natural language prompts to trigger the skill, for example:
```
Help me migrate this Rspack 1.x project to v2
```
## llms.txt
[llms.txt](https://llmstxt.org/) is a standard that helps LLMs discover and use project documentation. Rspack follows this standard and publishes the following two files:
- [llms.txt](https://rspack.rs/llms.txt): A structured index file containing the titles, links, and brief descriptions of all documentation pages.
```
https://rspack.rs/llms.txt
```
- [llms-full.txt](https://rspack.rs/llms-full.txt): A full-content file that concatenates the complete content of every documentation page into a single file.
```
https://rspack.rs/llms-full.txt
```
You can choose the file that best fits your use case:
- `llms.txt` is smaller and consumes fewer tokens, making it suitable for AI to fetch specific pages on demand.
- `llms-full.txt` contains the complete documentation content, so AI doesn't need to follow individual links — ideal when you need AI to have a comprehensive understanding of Rspack, though it consumes more tokens and is best used with AI tools that support large context windows.
## Markdown docs
Every Rspack documentation page has a corresponding `.md` plain-text version that can be provided directly to AI. On any doc page, you can click “Copy Markdown” or “Copy Markdown Link” under the title to get the Markdown content or link.
```
https://rspack.rs/guide/start/introduction.md
```
Providing the Markdown link or content allows AI to focus on a specific chapter, which is useful for targeted troubleshooting or looking up a particular topic.
## AGENTS.md
When you create a new project with [create-rspack](https://www.npmjs.com/package/create-rspack), the generated project includes an `AGENTS.md` file. This file follows the [AGENTS.md](https://agents.md/) specification and provides key project information to Agents.
Example `AGENTS.md` content:
```markdown wrapCode
# AGENTS.md
You are an expert in JavaScript, Rspack, and web application development. You write maintainable, performant, and accessible code.
## Commands
- `npm run dev` - Start the dev server
- `npm run build` - Build the app for production
- `npm run preview` - Preview the production build locally
## Docs
- Rspack:
```
You can also customize it for your project, adding more details about the project structure, overall architecture, and other relevant information so Agents can better understand your project.
::: tip
If you are using Claude Code, you can create a `CLAUDE.md` file and reference the `AGENTS.md` file in it.
```markdown title="CLAUDE.md"
@AGENTS.md
```
:::
---
url: /guide/features/plugin.md
---
import { Tabs, Tab } from '@theme';
# Plugins
If [loaders](/guide/features/loader) are the workhorse for file transformations, then plugins are the workhorse for the overall Rspack build process. Most of Rspack's native implementations rely on the Rust side of the plugin system.
For Node.js users, you don't need to worry about interoperability issues with Node.js and Rust, because Rspack takes care of those details for you automatically. You can just focus on how to use the plugins.
## Plugin usage
Rspack provides the [plugins](/config/plugins) configuration, which is used to register a set of Rspack or webpack plugins to customize the build process.
Here is an example of using the [webpack-bundle-analyzer](https://github.com/webpack/webpack-bundle-analyzer) in Rspack configuration:
```js title="rspack.config.mjs"
import { BundleAnalyzerPlugin } from 'webpack-bundle-analyzer';
export default {
plugins: [
new BundleAnalyzerPlugin({
// options
}),
],
};
```
```js title="rspack.config.cjs"
const { BundleAnalyzerPlugin } = require('webpack-bundle-analyzer');
module.exports = {
plugins: [
new BundleAnalyzerPlugin({
// options
}),
],
};
```
If you're looking for more Rspack plugins, have a look at the great list of [supported plugins](/plugins/index).
You can also refer to [Plugin compat](/guide/compatibility/plugin) for the list of webpack plugins that have passed Rspack compatibility tests.
## Other plugins
### Unplugin
[unplugin](https://github.com/unjs/unplugin) is a unified plugin system for various build tools. You can use plugins implemented based on unplugin in Rspack, typically by importing the `/rspack` subpath of the plugin and registering it through `plugins`.
Here is an example of using [unplugin-vue-components](https://www.npmjs.com/package/unplugin-vue-components):
```js title="rspack.config.mjs"
import Components from 'unplugin-vue-components/rspack';
export default {
plugins: [
Components({
// options
}),
],
};
```
```js title="rspack.config.cjs"
const Components = require('unplugin-vue-components/rspack');
module.exports = {
plugins: [
Components.default({
// options
}),
],
};
```
### SWC plugins
In the built-in [swc-loader](/guide/features/builtin-swc-loader) of Rspack, you can use SWC's Wasm plugins, see [jsc.experimental.plugins](/guide/features/builtin-swc-loader#jscexperimentalplugins).
### Rsbuild plugins
[Rsbuild](https://rsbuild.rs) is a build tool based on Rspack, and Rsbuild has its own plugin system.
Please note that you cannot use Rsbuild plugins in Rspack, because Rspack is a more low-level tool, but you can use Rspack plugins in Rsbuild.
Here is a comparison table for the plugins that can be used in Rspack and Rsbuild:
| Tool used | Rspack plugins | webpack plugins | Rsbuild plugins | Unplugins | SWC plugins |
| --------- | -------------- | --------------- | --------------- | --------- | ----------- |
| Rspack | ✅ | ✅ | ❌ | ✅ | ✅ |
| Rsbuild | ✅ | ✅ | ✅ | ✅ | ✅ |
> Please refer to the [Rsbuild plugin documentation](https://rsbuild.rs/plugins/list/index) for more information.
## Write a plugin
### Plugin structure
As a plugin author, the structure of a plugin is very simple: just implement an `apply` method that accepts a `Compiler` instance. It will be called when the Rspack plugin is initialized. The detailed API can be found in the [Plugin API](/api/plugin-api/index).
```js title="MyPlugin.mjs"
const PLUGIN_NAME = 'MyPlugin';
export class MyPlugin {
apply(compiler) {
compiler.hooks.compilation.tap(PLUGIN_NAME, (compilation) => {
console.log('The Rspack build process is starting!');
});
}
}
```
```js title="MyPlugin.cjs"
const PLUGIN_NAME = 'MyPlugin';
class MyPlugin {
apply(compiler) {
compiler.hooks.compilation.tap(PLUGIN_NAME, (compilation) => {
console.log('The Rspack build process is starting!');
});
}
}
module.exports = MyPlugin;
```
### Write with TypeScript
If you use TypeScript to write Rspack plugins, you can import `Compiler` and `RspackPluginInstance` to declare the types of your plugins:
```ts title="MyPlugin.ts"
import type { Compiler, RspackPluginInstance } from '@rspack/core';
const PLUGIN_NAME = 'MyPlugin';
export class MyPlugin implements RspackPluginInstance {
apply(compiler: Compiler) {
compiler.hooks.compilation.tap(PLUGIN_NAME, (compilation) => {
console.log('The Rspack build process is starting!');
});
}
}
```
---
url: /guide/features/loader.md
---
# Loader
Rspack has built-in support for JavaScript, CSS, JSON, and static assets modules.
A loader is a transformer that converts various types of modules into Rspack supported types. By using different kinds of loaders, you can extend Rspack to process additional module types, including JSX, Markdown, Sass, Less, and more.
When Rspack bundles a module, it first pre-processes the module through loaders, transforming it into a Rspack supported module type, and then post-processes the module according to the [rules[].type](/config/module-rules#rulestype).
## Compatibility with webpack loaders
Rspack allows you to use most webpack loaders in the community. See [awesome-rstack - Rspack loaders](https://github.com/rstackjs/awesome-rstack?tab=readme-ov-file#rspack-loaders) to find loaders provided by the community.
If you find an unsupported loader, please feel free to communicate with us through [GitHub Issues](https://github.com/web-infra-dev/rspack/issues).
## Writing loaders
Refer to [Writing loaders](/api/loader-api/writing-loaders) to learn how to develop a loader.
## Example
### Using Less
You can use [less-loader](https://github.com/webpack/less-loader) to transform the contents of the `.less` file accordingly.
```js title="rspack.config.mjs"
export default {
module: {
rules: [
{
test: /\.less$/,
use: [
{
loader: 'less-loader',
},
],
type: 'css',
},
],
},
};
```
[less-loader](https://github.com/webpack/less-loader) can transform Less files to Rspack-supported CSS module types, so you can set the type to `'css'` to instruct Rspack to use the CSS handling method that is natively supported for post-processing.
### Combining multiple loaders
You can chain multiple loaders for a particular [Rule](/config/module-rules#rules) match, with the loaders executed in right-to-left order.
For example, you can use [less-loader](https://github.com/webpack/less-loader) to do the transformation between Less to CSS types and [postcss-loader](https://github.com/webpack/postcss-loader) for the transformed source code to perform a secondary transformation, which will then get passed to Rspack's CSS post-processor for further processing.
```js title="rspack.config.mjs"
export default {
module: {
rules: [
{
test: /\.less$/,
use: [
{
loader: 'postcss-loader',
},
{
loader: 'less-loader',
},
],
type: 'css',
},
],
},
};
```
### Passing configuration items
You can use [rules[].use](/config/module-rules#rulesuse) to pass the relevant configuration to the loader, for example:
```js title="rspack.config.mjs"
export default {
module: {
rules: [
{
test: /\.css$/,
use: [
{
loader: 'postcss-loader',
options: {
postcssOptions: {
// ...
},
},
},
],
type: 'css',
},
],
},
};
```
### Using a custom loader
You can use a custom loader with Rspack. In the example below, we'll use the loader API to write a simple banner-loader.
The purpose of the banner-loader is to prepend a banner comment at the header of each module, such as a license notice:
```js
/**
* MIT Licensed
* Copyright (c) 2022-present ByteDance, Inc. and its affiliates.
* https://github.com/web-infra-dev/rspack/blob/main/LICENSE
*/
```
Create a new `banner-loader.js` file under the root of the project with the following content:
```js title="banner-loader.js"
const BANNER = `/**
* MIT Licensed
* Copyright (c) 2022-present ByteDance, Inc. and its affiliates.
* https://github.com/web-infra-dev/rspack/blob/main/LICENSE
*/`;
module.exports = function (content) {
return `${BANNER}\n${content}`;
};
```
The first input to this loader is the content of the file, allowing us to process the file content and return the transformed result. The script file must be imported using CommonJS `require()`.
For example, to add a banner to all `*.js` files, the configuration might look like this:
```js title="rspack.config.mjs"
export default {
module: {
rules: [
{
test: /\.js$/,
loader: './banner-loader.js',
},
],
},
};
```
For details, you can refer to [loader-api](/api/loader-api/index)
### Using built-in loader
Built-in Loaders offer superior performance compared to JS Loaders, without sacrificing the composability of JS Loaders. The following are some built-in loaders.
- [builtin:swc-loader](/guide/features/builtin-swc-loader)
- [builtin:lightningcss-loader](/guide/features/builtin-lightningcss-loader)
---
url: /guide/features/dev-server.md
---
# Dev server
Rspack CLI comes with a built-in `@rspack/dev-server` for development and debugging. Its capabilities are similar to `webpack-dev-server`, including features like hot module replacement (HMR), proxy server and more.
:::tip
`webpack-dev-server@5` is used in `@rspack/dev-server`, which has some differences from `webpack-dev-server@4`.
- The minimum supported Node.js version for webpack-dev-server v5 is 18.12.0.
- Several configuration options have changed. Please refer to the [webpack-dev-server v5 migration guide](https://github.com/webpack/webpack-dev-server/blob/master/migration-v5.md).
:::
### HMR
By default, Rspack enables HMR in dev mode. You can disable HMR by configuring the `devServer.hot` option in Rspack configuration.
```js title="rspack.config.mjs"
export default {
devServer: {
hot: false,
},
};
```
:::warning
Do not include `[hash]` or `[contenthash]` in [output.cssFilename](/config/output#outputcssfilename), otherwise CSS HMR may not work.
:::
### Proxy
Rspack has a built-in simple proxy server. You can enable the proxy server by configuring the `devServer.proxy` option in Rspack configuration. The devServer internally uses [http-proxy-middleware](https://github.com/chimurai/http-proxy-middleware) to implement the proxy function. For example, you can proxy `/api` to `http://localhost:3000` as follows:
```js title="rspack.config.mjs"
export default {
devServer: {
proxy: [
{
context: ['/api'],
target: 'http://localhost:3000',
changeOrigin: true,
},
],
},
};
```
For more devServer configuration options, please refer to [devServer](/config/dev-server.html).
---
url: /guide/features/asset-module.md
---
# Asset modules
Rspack has built-in support for assets (e.g. images, fonts, videos, etc.), which means you don't need any loader to process them.
Unlike other module types, assets usually stand alone, so they are generated at the granularity of a module.
:::tip Module and Chunk
Other module types, such as JavaScript modules, are usually bundled into one or more chunks for final bundle generation. In the case of asset modules, it is almost impossible to be bundled, so they usually exist independently. This is one of the most straightforward reasons why it is called a "asset module."
:::
## Supported asset module types
- **`'asset/inline'`**: Converts an asset to a DataURI, using Base64 encoding, no encoding configuration is supported at this time.
- **`'asset/resource'`**: Converts an asset to a separate file and exports the URL address.
- **`'asset'`**:
- Automatically selects `'asset/inline'` or `'asset/resource'` depending on the size of the asset, depending on the configuration
- By default, the `'asset/inline'` mechanism is applied if the asset size is less than or equal to 8096 bytes, otherwise the `'asset/resource'` mechanism is used.
- **`'asset/source'`**: Converts and exports the asset file as a raw string.
- **`'asset/bytes'`**: Converts and exports the asset file as a binary data `Uint8Array`.
## Example
### Using `type: 'asset'`
Using `type: 'asset'` to automatically select a mechanism based on conditions:
```js title="rspack.config.mjs"
export default {
module: {
rules: [
{
test: /\.png$/,
type: 'asset',
},
],
},
};
```
By default, the `'asset/inline'` mechanism is applied if the asset size is less than or equal to 8096 bytes, otherwise the `'asset/resource'` policy is used.
If you wish to modify this behavior, you can use [`module.parser.asset.dataUrlCondition`](/config/module#moduleparserasset) to modify the global configuration, or use [`rules[].parser.dataUrlCondition`](/config/module-rules#rulesparserdataurlcondition) to configure it separately for a specific eligible module.
### Replacing `url-loader`
Replacing `url-loader` with `type: 'asset/inline'`:
```diff title="rspack.config.mjs"
export default {
module: {
rules: [
{
test: /\.png$/,
- use: [
- {
- loader: 'url-loader',
- },
- ],
+ type: 'asset/inline'
},
],
},
};
```
### Replacing `file-loader`
Replacing `file-loader` with `type: 'asset/resource'`:
```diff title="rspack.config.mjs"
export default {
module: {
rules: [
{
test: /\.png$/,
- use: [
- {
- loader: 'file-loader',
- },
- ],
+ type: 'asset/resource'
},
],
},
};
```
### Replacing `raw-loader`
Replacing `raw-loader` with `type: 'asset/source'`:
```diff title="rspack.config.mjs"
export default {
module: {
rules: [
{
resourceQuery: /raw/,
- use: [
- {
- loader: 'raw-loader',
- },
- ],
+ type: 'asset/source'
},
],
},
};
```
### Using optimizers as loaders
There are times when we want to optimize a specific image, for example by compressing its size. We can still use these loaders.
For example, optimizing all files ending in `.png` with [image-minimizer-webpack-plugin](https://github.com/webpack/image-minimizer-webpack-plugin):
```js title="rspack.config.mjs"
import ImageMinimizerPlugin from 'image-minimizer-webpack-plugin';
export default {
module: {
rules: [
{
test: /\.png$/,
use: [
{
loader: ImageMinimizerPlugin.loader,
options: {
// ...
},
},
],
type: 'asset/resource',
},
],
},
};
```
The above condition uses `type: 'asset/resource'`, which will direct Rspack to complete individual file generation for all matching files and return the final asset URL address.
---
url: /guide/features/asset-base-path.md
---
# Asset base path
Rspack provides the [output.publicPath](/config/output#outputpublicpath) option, which sets the base URL path prefix for bundled static assets (such as JS, CSS, images, etc.).
## Use cases
Imagine the following scenarios:
- Your static assets need to be deployed to a CDN
- Your web application is not deployed under the root path of the domain
- You need to use different assets paths for different environments (development, testing, or production)
In these scenarios, configuring `output.publicPath` can help you load static assets correctly.
## Basic example
Set `output.publicPath` to `/`, then the assets path will be relative to the root path.
```js title="rspack.config.mjs"
export default {
output: {
publicPath: '/',
},
};
```
With this configuration, the assets access path is `http://[domain]/`, for example `http://localhost:8080/main.js`.
## Subdirectory
If your application needs to be deployed under a subdirectory, you can set `output.publicPath` to the corresponding subdirectory path:
```js title="rspack.config.mjs"
export default {
output: {
publicPath: '/assets/',
},
};
```
With this configuration, all assets will be loaded from the `/assets/` path, for example `http://localhost:8080/assets/main.js`.
:::tip
- The value of `output.publicPath` usually ends with `/`.
- Do not set `output.publicPath` to a relative path, such as `./assets/`. Using a relative path may cause assets to load incorrectly when they are located at different path depths.
- If setting `output.publicPath` to an empty string, the asset URL path will be relative to the HTML page (same directory).
:::
## Use CDN
When deploying static assets using CDN, you can set `output.publicPath` based on the environment variable, and set it to the CDN URL prefix during the production build.
```js title="rspack.config.mjs"
const isProd = process.env.NODE_ENV === 'production';
export default {
output: {
publicPath: isProd ? 'https://cdn.example.com/' : '/',
},
};
```
With this configuration:
- In the development mode, the assets access path is `http://[domain]/`, for example `http://localhost:8080/main.js`.
- In the production mode, the assets access path is `https://cdn.example.com/`, for example `https://cdn.example.com/main.[hash].js`.
## Dynamically set publicPath
You can set `publicPath` dynamically using `__webpack_public_path__` in your JavaScript code.
The `__webpack_public_path__` will override the `output.publicPath` in the Rspack config, but it will only take effect for dynamically loaded assets, not for assets loaded via `
```
You can refer to the related example [example-vue3](https://github.com/rstackjs/rstack-examples/tree/main/rspack/vue).
## Vue 2
Rspack has completed compatibility with Vue 2 (using vue-loader@15).
Please make sure to turn off `experiments.css` when configuring Vue 2 projects or use `rules[].type = "javascript/auto"` in CSS-related rules:
```js title="rspack.config.mjs"
export default {
module: {
rules: [
{
test: /\.css$/,
use: ['vue-style-loader', 'css-loader'],
type: 'javascript/auto',
},
{
test: /\.ts$/, // add this rule when you use TypeScript in Vue SFC
loader: 'builtin:swc-loader',
options: {
jsc: {
parser: {
syntax: 'typescript',
},
},
},
type: 'javascript/auto',
},
],
},
experiments: {
css: false,
},
};
```
TypeScript is supported using Rspack's native `builtin:swc-loader`, see [this](/guide/features/builtin-swc-loader) for details.
You can refer to the related example [example-vue2](https://github.com/rstackjs/rstack-examples/tree/main/rspack/vue2) and [example-vue2-ts](https://github.com/rstackjs/rstack-examples/tree/main/rspack/vue2-ts).
## Vue 3 JSX
Since Rspack supports using `babel-loader`, you can directly use the [@vue/babel-plugin-jsx](https://github.com/vuejs/babel-plugin-jsx) plugin to support Vue 3 JSX syntax.
### Install
First, you need to install [babel-loader](https://www.npmjs.com/package/babel-loader), [@babel/core](https://www.npmjs.com/package/@babel/core) and [@vue/babel-plugin-jsx](https://www.npmjs.com/package/@vue/babel-plugin-jsx):
### Configure
Then add the following configuration to support Vue 3 JSX syntax in `.jsx` files:
```js title="rspack.config.mjs"
import { defineConfig } from '@rspack/cli';
export default defineConfig({
entry: {
main: './src/index.jsx',
},
module: {
rules: [
{
test: /\.jsx$/,
use: [
{
loader: 'babel-loader',
options: {
plugins: ['@vue/babel-plugin-jsx'],
},
},
],
},
],
},
});
```
Rspack provides a [example](https://github.com/rstackjs/rstack-examples/tree/main/rspack/vue3-jsx) of Vue JSX for reference.
---
url: /guide/tech/next.md
---
import { Tabs, Tab, PackageManagerTabs } from '@theme';
# Next.js
[next-rspack](https://www.npmjs.com/package/next-rspack) is a community-driven plugin that enables Next.js projects to use Rspack as the bundler (experimental).
:::tip
See the [Rspack joins the Next.js ecosystem](/blog/rspack-next-partner) blog post to learn more details.
:::
## Installation
Install the `next-rspack` package:
:::tip
If you are using a Next.js version below 15.3.0, please upgrade to >= 15.3.0 first, see [Next.js - Upgrading](https://nextjs.org/docs/pages/building-your-application/upgrading).
:::
## Usage
Wrap your existing configuration in the project's `next.config.js` or `next.config.ts`:
```ts
import withRspack from 'next-rspack';
import type { NextConfig } from 'next';
const nextConfig: NextConfig = {
/* config options here */
};
export default withRspack(nextConfig);
```
```ts
const withRspack = require('next-rspack');
/** @type {import('next').NextConfig} */
const nextConfig = {
/* config options here */
};
module.exports = withRspack(nextConfig);
```
> Example: [next.js/examples/with-rspack](https://github.com/vercel/next.js/tree/canary/examples/with-rspack).
## Customizing Rspack configuration
Through Rspack's compatibility with webpack, when using `next-rspack`, you can customize configurations in the same way as you would with webpack.
In `next.config.js`, modify Rspack's configuration by adding the following callback function:
```js title="next.config.js"
module.exports = {
webpack: (
config,
{ buildId, dev, isServer, defaultLoaders, nextRuntime, webpack },
) => {
// Important: return the modified config
return config;
},
};
```
> For more details, see the [Next.js - Custom Webpack Config](https://nextjs.org/docs/app/api-reference/config/next-config-js/webpack).
## Usage with next-compose-plugins
Alternatively, you can use [next-compose-plugins](https://www.npmjs.com/package/next-compose-plugins) to quickly integrate `next-rspack` with other Next.js plugins:
```js title="next.config.js"
const withPlugins = require('next-compose-plugins');
const withRspack = require('next-rspack');
module.exports = withPlugins([
[withRspack],
// your other plugins here
]);
```
---
url: /guide/tech/nestjs.md
---
# NestJS
Rspack not only supports building frontend projects but also supports building Node.js App like NestJS.
Rspack provides NestJS [example](https://github.com/rstackjs/rstack-examples/tree/main/rspack/nestjs) for reference.
## Native node modules
When building Node.js applications with Rspack, you may encounter dependencies that include Node.js native addon dependencies (`.node` modules). Because `.node` modules cannot be packaged into JavaScript artifacts, special handling is usually required. node-loader can be used to handle addon packaging very well.
```js title="rspack.config.mjs"
export default {
module: {
rules: [
{
test: /\.node$/,
use: [
{
loader: 'node-loader',
options: {
name: '[path][name].[ext]',
},
},
],
},
],
},
};
```
---
url: /guide/tech/solid.md
---
# Solid
## How to use
Rspack provides two solutions to support Solid:
- **Use Rsbuild**: Rsbuild provides out-of-the-box support for Solid, allowing you to quickly create a Solid project. See [Rsbuild - Solid](https://rsbuild.rs/guide/framework/solid) for details.
- **Manually configure Rspack**: You can refer to the current document to manually add configurations for Solid.
## Configure Solid
Thanks to the good compatibility of Rspack with the babel-loader, it is very easy to use Solid in Rspack. All you need is babel-loader and Solid babel preset. Rspack provides Solid [example](https://github.com/rstackjs/rstack-examples/tree/main/rspack/solid) for reference.
```js title="rspack.config.mjs"
import { defineConfig } from '@rspack/cli';
export default defineConfig({
entry: {
main: './src/index.jsx',
},
module: {
rules: [
{
test: /\.jsx$/,
use: [
{
loader: 'babel-loader',
options: {
presets: ['solid'],
plugins: ['solid-refresh/babel'],
},
},
],
},
],
},
});
```
---
url: /guide/tech/svelte.md
---
# Svelte
## How to use
Rspack provides two solutions to support Svelte:
- **Use Rsbuild**: Rsbuild provides out-of-the-box support for Svelte, allowing you to quickly create a Svelte project. See ["Rsbuild - Svelte"](https://rsbuild.rs/guide/framework/svelte) for details.
- **Manually configure Rspack**: You can refer to the current document to manually add configurations for Svelte.
## Configure svelte-loader
Thanks to the good compatibility of Rspack with the [svelte-loader](https://github.com/sveltejs/svelte-loader), it is very easy to use Svelte in Rspack. All you need is to configure svelte-loader. Rspack provides Svelte [example](https://github.com/rstackjs/rstack-examples/tree/main/rspack/svelte) for reference.
```js title="rspack.config.mjs"
import path from 'node:path';
import { defineConfig } from '@rspack/cli';
import { createRequire } from 'node:module';
const require = createRequire(import.meta.url);
export default defineConfig({
entry: {
main: './src/main.ts',
},
resolve: {
alias: {
svelte: path.dirname(require.resolve('svelte/package.json')),
},
extensions: ['.mjs', '.js', '.ts', '.svelte'],
mainFields: ['svelte', 'browser', 'module', 'main'],
},
module: {
rules: [
{
test: /\.svelte$/,
use: [
{
loader: 'svelte-loader',
options: {
compilerOptions: {
dev: !prod,
},
emitCss: prod,
hotReload: !prod,
preprocess: sveltePreprocess({ sourceMap: !prod, postcss: true }),
},
},
],
},
],
},
});
```
---
url: /guide/optimization/analysis.md
---
# Bundle analysis
## Rsdoctor's bundle analysis
[Rsdoctor](/guide/optimization/use-rsdoctor) provides the `Bundle Size` module, which is mainly used to analyze the information of the outputs of Rspack, including the size of resources, duplicate packages, and module reference relationships:
- **Bundle Overview**: Displays the total number and size of artifacts, as well as the number and size of each file type. It also shows the duplicate packages and their reference chains.
- **Bundle Analysis Module**: Analyzes the size and code information of the build artifacts' resources (**Assets**) and the included **Modules**. In this module, you can view the **actual code size of modules after packaging** in the Assets, as well as the original code or **packaged code segments** and **module reference relationships**.
Click on the **"Bundle Size"** option in the navigation bar to view the Bundle analysis report. You can see more details from this page: [Bundle Size](https://rsdoctor.rs/guide/usage/bundle-size)
### Reduce duplicate dependencies
Bundle size optimization is an important part in production build because it directly affects the user experience of online users. In this document, we will introduce some common bundle size optimization methods in Rspack.
It is common for web projects to bundle multiple versions of third-party dependencies. Duplicate dependencies can lead to increased bundle size and slower build speed.
- Detect duplicate dependencies
You can use [Rsdoctor](https://rsdoctor.rs) to detect whether there are duplicate dependencies in the project. Rsdoctor will analyze during the build process, find any duplicate bundled dependencies and display them visually:

For more details, see [Rsdoctor - Duplicate Dependency Problem](https://rsdoctor.rs/blog/topic/duplicate-pkg-problem).
## webpack-bundle-analyzer
Rspack's Command Line Interface (CLI) supports bundle analysis out-of-box via the `--analyze` option. It uses [webpack-bundle-analyzer](https://www.npmjs.com/package/webpack-bundle-analyzer) behind the scenes.
```sh
$ rspack build --analyze
```
## bundle-stats and statoscope
You can also generate a `stats.json` file for further analysis with other bundle analysis tools like [bundle-stats](https://github.com/relative-ci/bundle-stats) or [statoscope](https://statoscope.tech/):
```sh
$ rspack build --json stats.json
```
---
url: /guide/optimization/code-splitting.md
---
import WebpackLicense from '@components/WebpackLicense';
# Code splitting
Rspack supports code splitting, letting you divide your code into separate chunks. You have full control over the size and number of generated assets to improve loading performance.
Here, a Chunk refers to a resource that a browser needs to load.
## Dynamic import
Rspack uses the [import()](https://developer.mozilla.org/en-US/docs/Web/JavaScript/Reference/Operators/import) syntax that conforms to the ECMAScript proposal for dynamic imports.
In `index.js`, we dynamically import two modules through `import()`, separating them into a new chunk.
```js title=index.js
import('./foo.js');
import('./bar.js');
```
```js title=foo.js
import './shared.js';
console.log('foo.js');
```
```js title=bar.js
import './shared.js';
console.log('bar.js');
```
Building this project produces three chunks: `src_bar_js.js`, `src_foo_js.js`, and `main.js`. Inspecting them shows that `shared.js` exists in both `src_bar_js.js` and `src_foo_js.js`. We will cover how to remove duplicated modules later.
:::tip
1. Refer to [Module methods - Dynamic import()](/api/runtime-api/module-methods#dynamic-import) for the detailed dynamic import API, as well as how to use dynamic expressions and magic comments in dynamic import.
2. Although `shared.js` exists in two chunks, it is executed only once, so you don't have to worry about multiple instances.
3. Use the [output.asyncChunks option](/config/output/#outputasyncchunks) to control whether dynamically imported modules generate independent async chunks.
:::
## Entry point
This is the simplest and most intuitive way to split the code, but it requires manual configuration. Let's start by looking at how to create multiple Chunks from multiple entry points.
```js title="rspack.config.mjs"
export default {
mode: 'development',
entry: {
index: './src/index.js',
another: './src/another-module.js',
},
stats: 'normal',
};
```
```js title=index.js
import './shared';
console.log('index.js');
```
```js title=another-module.js
import './shared';
console.log('another-module');
```
This will yield the following build result:
```
...
Asset Size Chunks Chunk Names
another.js 1.07 KiB another [emitted] another
index.js 1.06 KiB index [emitted] index
Entrypoint another = another.js
Entrypoint index = index.js
[./src/index.js] 41 bytes {another} {index}
[./src/shared.js] 24 bytes {another} {index}
```
Similarly, examining the output shows that they all include the repeated `shared.js`.
## Configuring chunk splitting
The splitting approach above is intuitive, but most modern browsers support concurrent network requests. If we split a single-page application into one chunk per page, the browser still has to fetch a large chunk when users switch pages, which wastes that concurrency. Instead, we can break the chunk into smaller ones and request those smaller chunks at the same time to use the browser's network capacity more effectively.
Rspack defaults to splitting files in the `node_modules` directory and duplicate modules, extracting these modules from their original Chunk into a separate new Chunk. Why does `shared.js` still appear repeatedly in our example above? The `shared.js` file here is very small, and splitting such a small module into its own Chunk can actually slow down loading.
We can configure the minimum split size through [splitChunks.minSize](/plugins/webpack/split-chunks-plugin#splitchunksminsize) to 0 to allow `shared.js` to be extracted on its own.
```diff title="rspack.config.mjs"
export default {
entry: {
index: './src/index.js',
},
+ optimization: {
+ splitChunks: {
+ minSize: 0,
+ }
+ }
};
```
After rebuilding, you will find that `shared.js` has been extracted separately, and there is an additional Chunk in the output that contains only `shared.js`.
### Force the splitting of certain modules
We can use [`optimization.splitChunks.cacheGroups.{cacheGroup}.name`](/plugins/webpack/split-chunks-plugin#splitchunkscachegroupscachegroupname) to force specific modules to be grouped into the same chunk, for example, with the following configuration:
```js title="rspack.config.mjs"
export default {
optimization: {
splitChunks: {
cacheGroups: {
someLib: {
test: /\/some-lib\//,
name: 'lib',
},
},
},
},
};
```
With the above configuration, all files that include the `some-lib` directory in their path can be extracted into a single Chunk named `lib`. If the modules in `some-lib` are rarely changed, this Chunk will consistently hit the user's browser cache, thus a well-considered configuration like this can increase the cache hit rate.
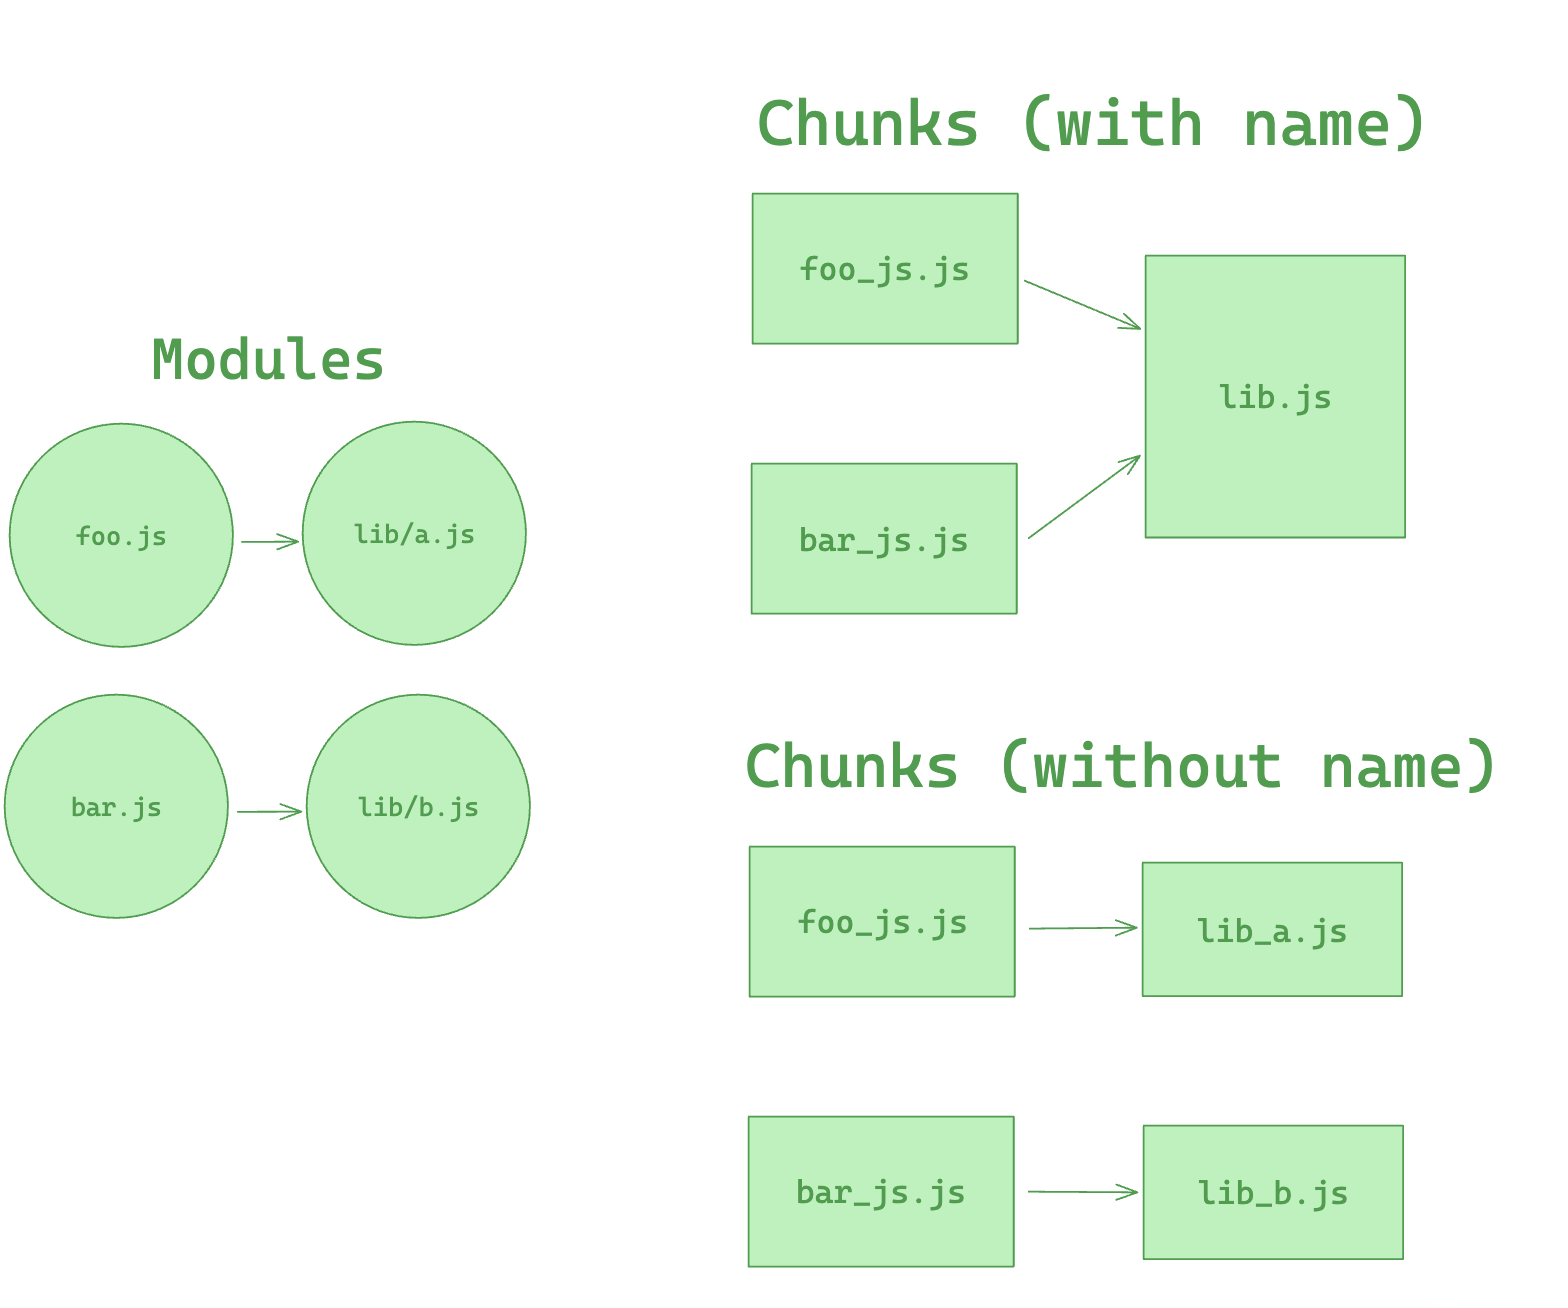
However, separating `some-lib` into an independent Chunk can also have downsides. Suppose a Chunk only depends on a very small file within `some-lib`, but since all files of `some-lib` are split into a single Chunk, this Chunk has to rely on the entire `some-lib` Chunk, resulting in a larger load volume. Therefore, when using cacheGroups.\{cacheGroup\}.name, careful consideration is needed.
Here is an example showing the effect of the `name` configuration of cacheGroup.
## Prefetching/Preloading modules
Adding these inline directives to your imports allows Rspack to output resource hints that tell the browser that:
- **prefetch**: resource is probably needed for some navigation in the future
- **preload**: resource will also be needed during the current navigation
An example of this is having a `HomePage` component, which renders a `LoginButton` component which then on demand loads a `LoginModal` component after being clicked.
```js title=LoginButton.js
//...
import(/* webpackPrefetch: true */ './path/to/LoginModal.js');
```
This will result in `` being appended in the head of the page, which will instruct the browser to prefetch in idle time the `login-modal-chunk.js` file.
:::info
Rspack will add the prefetch hint once the parent chunk has been loaded.
:::
Preload directive has a bunch of differences compared to prefetch:
- A preloaded chunk starts loading in parallel to the parent chunk. A prefetched chunk starts after the parent chunk finishes loading.
- A preloaded chunk has medium priority and is instantly downloaded. A prefetched chunk is downloaded while the browser is idle.
- A preloaded chunk should be instantly requested by the parent chunk. A prefetched chunk can be used anytime in the future.
- Browser support is different.
An example of this can be having a `Component` which always depends on a big library that should be in a separate chunk.
Let's imagine a component `ChartComponent` which needs a huge `ChartingLibrary`. It displays a `LoadingIndicator` when rendered and instantly does an on demand import of `ChartingLibrary`:
```js title=ChartComponent.js
//...
import(/* webpackPreload: true */ 'ChartingLibrary');
```
When a page which uses the `ChartComponent` is requested, the charting-library-chunk is also requested via ``. Assuming the page-chunk is smaller and finishes faster, the page will be displayed with a `LoadingIndicator`, until the already requested `charting-library-chunk` finishes. This will give a little load time boost since it only needs one round-trip instead of two. Especially in high-latency environments.
:::info
Using webpackPreload incorrectly can actually hurt performance, so be careful when using it.
:::
Sometimes you need to have your own control over preload. For example, preload of any dynamic import can be done via async script. This can be useful in case of streaming server side rendering.
```js
const lazyComp = () =>
import('DynamicComponent').catch((error) => {
// Do something with the error.
// For example, we can retry the request in case of any net error
});
```
If the script loading will fail before Rspack starts loading of that script by itself (Rspack creates a script tag to load its code, if that script is not on a page), that catch handler won't start till chunkLoadTimeout is not passed. This behavior can be unexpected. But it's explainable — Rspack can not throw any error, cause Rspack doesn't know, that script failed. Rspack will add onerror handler to the script right after the error has happen.
To prevent such problem you can add your own onerror handler, which removes the script in case of any error:
```html
```
In that case, errored script will be removed. Rspack will create its own script and any error will be processed without any timeouts.
---
url: /guide/optimization/lazy-barrel.md
---
# Lazy barrel
Lazy barrel is a stable optimization feature in Rspack that improves build performance by skipping the building of unused re-export modules in side-effect-free barrel files.
## What is a barrel file
A barrel file is a module that re-exports functionality from other modules, commonly used to create a cleaner public API for a package or directory:
```js title="components/index.js (barrel file)"
export { Button } from './Button';
export { Card } from './Card';
export { Modal } from './Modal';
export { Tabs } from './Tabs';
// ... dozens more components
```
This allows consumers to import from a single entry point:
```js
import { Button, Card } from './components';
```
However, barrel files can cause performance issues because bundlers traditionally need to build all re-exported modules, even if only a few are actually used.
## How lazy barrel works
When lazy barrel optimization is enabled (which it is by default), Rspack will skip building unused re-export modules in side-effect-free barrel files until they're actually needed.
### Example
```js title="src/index.js"
import { Button } from './components';
console.log(Button);
```
```js title="src/components/index.js (barrel file)"
export { Button } from './Button';
export { Card } from './Card';
export { Modal } from './Modal';
// ... many more exports
```
With lazy barrel optimization:
- ✅ Only `Button.js` is built
- ✅ `Card.js`, `Modal.js`, and other unused modules are not built
- ✅ Faster build times, especially in large projects
Without lazy barrel optimization:
- ❌ All modules (`Button.js`, `Card.js`, `Modal.js`, etc.) would be built
- ❌ Slower build times, even though most modules are unused
## Requirements
For lazy barrel optimization to work, barrel files must be side-effect-free. A module is considered side-effect-free when it meets one of the following conditions:
1. Package-level declaration: The `package.json` file declares `"sideEffects": false`
```json title="package.json"
{
"name": "my-components",
"sideEffects": false
}
```
See [Side effects analysis](/guide/optimization/tree-shaking#side-effects-analysis) for more details.
2. Module-level declaration: Modules explicitly marked as side-effect-free through [`rules[].sideEffects`](/config/module-rules#rulessideeffects)
```js title="rspack.config.mjs"
export default {
module: {
rules: [
{
test: /\.js$/,
sideEffects: false,
},
],
},
};
```
## Supported export patterns
Lazy barrel optimization works with the following export patterns:
### Named re-exports
```js
export { Component } from './Component';
export { utils } from './utils';
```
### Namespace re-exports
```js
export * as Components from './components';
```
### Named exports from local declarations
```js
export const API_URL = 'https://api.example.com';
export function helper() {
/* ... */
}
```
### Default exports
```js
export default function App() {
/* ... */
}
// The name is "default" for lazy barrel purposes
```
## Star re-exports (`export *`)
Star re-exports (`export * from "./module"`) are not fully optimized by lazy barrel and remain a performance concern.
```js title="components/index.js (barrel file with star re-exports)"
export * from './Button';
export * from './Card';
export * from './Modal';
export const API_VERSION = '1.0';
```
### When lazy barrel can still optimize
Lazy barrel will skip building star re-exports only when:
1. The barrel file is side-effect-free, and
2. The imported specifier is found in the barrel's named exports
Example scenario where optimization works:
```js title="src/index.js"
import { API_VERSION } from './components';
console.log(API_VERSION);
```
In this case:
- ✅ `API_VERSION` is a named export in the barrel file itself
- ✅ Rspack can optimize this—no modules are built (`Button.js`, `Card.js`, `Modal.js` are all skipped)
Example scenario where optimization fails:
```js title="src/index.js"
import { Button } from './components';
console.log(Button);
```
In this case:
- ❌ `Button` is not a named export in the barrel file—it's from `export * from './Button'`
- ❌ Rspack must build `./Button.js` and potentially all other star re-exports to find which module exports `Button`
## FAQ
### 1. Does lazy barrel support CommonJS?
Currently, lazy barrel only supports ES modules (ESM). CommonJS support would require improvements to Rspack's CommonJS tree shaking, particularly the static analysis capabilities. Support for CommonJS may be added in a future release.
### 2. Can Rspack automatically detect side-effect-free modules?
Rspack can analyze whether a module has side effects (this capability is already used by [`optimization.sideEffects`](/config/optimization#optimizationsideeffects) for tree shaking). However, this analysis requires checking the module's dependencies recursively—a module is only truly side-effect-free when all its dependencies are also side-effect-free.
During the make phase, dependencies must be built before their side effects can be analyzed. Lazy barrel is specifically designed to avoid building those dependencies. Therefore, it relies on explicit markers like `"sideEffects": false` in `package.json` or `rules[].sideEffects`, which don't require dependency checking since they declare the entire package or matched modules as side-effect-free.
## Configuration
Lazy barrel is enabled by default since Rspack 1.6.0. No configuration is needed.
If you're using an older version and have `experiments.lazyBarrel` in your configuration, you can safely remove it:
```diff title="rspack.config.mjs"
export default {
- experiments: {
- lazyBarrel: true,
- },
};
```
:::warning Deprecated configuration
The `experiments.lazyBarrel` configuration option has been deprecated and will be removed in Rspack v2.0.
:::
## Further reading
- [RFC: Lazy make for reexports in side effects free barrel file](https://github.com/web-infra-dev/rspack/discussions/11273)
- [Tree shaking](/guide/optimization/tree-shaking)
- [Side effects analysis](/guide/optimization/tree-shaking#side-effects-analysis)
---
url: /guide/optimization/production.md
---
# Production optimization
## Code splitting
Rspack supports code splitting, which allows splitting the code into other chunks. You have the full control about size and number of generated assets, which allow you to gain performance improvements in loading time.
See [Code splitting](/guide/optimization/code-splitting) for more details.
## Tree shaking
Rspack supports tree shaking, a terminology widely used within the JavaScript ecosystem defined as the removal of unused code, commonly referred to as "dead code".
See [Tree shaking](/guide/optimization/tree-shaking) for more details.
## Minification
During the production build, Rspack uses the built-in minimizer to minify JavaScript and CSS code by default.
If you need to customize the minification options, you can use [SwcJsMinimizerRspackPlugin](/plugins/rspack/swc-js-minimizer-rspack-plugin) and [LightningCssMinimizerRspackPlugin](/plugins/rspack/lightning-css-minimizer-rspack-plugin) for configuration.
```js title="rspack.config.mjs"
import { rspack } from '@rspack/core';
export default {
optimization: {
minimizer: [
new rspack.SwcJsMinimizerRspackPlugin({
// JS minimizer configuration
}),
new rspack.LightningCssMinimizerRspackPlugin({
// CSS minimizer configuration
}),
],
},
};
```
If the built-in minimizer cannot meet your needs, you can also use [optimization.minimizer](/config/optimization#optimizationminimizer) to set custom minimizers.
---
url: /guide/optimization/profile.md
---
# Build performance profile
This chapter introduces some common performance bottlenecks and performance profile methods for Rspack.
## Analysis with Rsdoctor
[Rsdoctor](https://rsdoctor.rs/) is a build analyzer that can visually display the build process, such as compilation time, code changes before and after compilation, module reference relationships, duplicate modules, etc.
Please refer to [Use Rsdoctor](/guide/optimization/use-rsdoctor) for more information.
## Rspack profile
The Rspack CLI supports the use of the `RSPACK_PROFILE` environment variable for build performance profile.
```sh
RSPACK_PROFILE=ALL rspack build
```
This command will generate a `.rspack-profile-${timestamp}-${pid}` folder, and it will contain the `trace.json` file, which is generated by Rspack based on [tracing](https://github.com/tokio-rs/tracing) and can be viewed using [ui.perfetto.dev](https://ui.perfetto.dev/).
> See [Tracing](/contribute/development/tracing) for more information.
## Performance bottlenecks
Although Rspack itself provides good build performance, the use of some JavaScript loaders and plugins in Rspack can slow down the build performance, especially on large projects.
Some of these issues can be resolved with Rspack's built-in high performance alternatives, while others can be identified and optimized using performance analysis tools.
Here are some common cases:
### babel-loader
[babel-loader](https://github.com/babel/babel-loader) compiles JavaScript and TypeScript code using Babel. You can replace Babel with the faster SWC. Rspack comes with a built-in [builtin:swc-loader](/guide/features/builtin-swc-loader), which is the Rust version of `swc-loader` and is intended to provide better performance.
If you need to use some Babel plugins for custom transformations, configure babel-loader with [rules[].include](/config/module-rules#rulesinclude) to match as few files as possible to reduce the Babel compilation overhead.
### postcss-loader
[postcss-loader](https://github.com/postcss/postcss-loader) compiles CSS code based on PostCSS, which is often used with PostCSS plugins to downgrade CSS syntax, add vendor prefixes, etc. You can replace PostCSS with the faster Lightning CSS by using Rspack's built-in [builtin:lightningcss-loader](/guide/features/builtin-lightningcss-loader).
### terser-webpack-plugin
[terser-webpack-plugin](https://github.com/webpack/terser-webpack-plugin) minifies JavaScript code based on Terser. You can replace Terser with the faster SWC minimizer by using Rspack's built-in [SwcJsMinimizerRspackPlugin](/plugins/rspack/swc-js-minimizer-rspack-plugin).
### css-minimizer-webpack-plugin
[css-minimizer-webpack-plugin](https://github.com/webpack/css-minimizer-webpack-plugin) minifies CSS code based on tools like cssnano. You can replace cssnano with the faster Lightning CSS minimizer by using Rspack's built-in [LightningCssMinimizerRspackPlugin](/plugins/rspack/lightning-css-minimizer-rspack-plugin).
### less-loader
[less-loader](https://github.com/webpack/less-loader) compiles `.less` files based on Less. Since Less currently lacks an officially implemented high performance alternative, it is recommended to use [sass-loader](https://github.com/webpack/sass-loader) and [sass-embedded](https://www.npmjs.com/package/sass-embedded) instead. `sass-embedded` is a JavaScript wrapper for Sass's native Dart executable that provides excellent performance.
### html-webpack-plugin
[html-webpack-plugin](https://github.com/jantimon/html-webpack-plugin) performs poorly when generating large numbers of HTML files. The [HtmlRspackPlugin](/plugins/rspack/html-rspack-plugin) implemented in Rust by Rspack can provide better performance.
## Blocking thread pool size
Rspack internally uses a dedicated thread pool to handle blocking operations such as file system reads and writes, preventing the main thread from being blocked.
By default, the pool size is set to `4`, matching Node.js's [libuv](https://docs.libuv.org/en/v1.x/threadpool.html) behavior, which provides stable performance across most development and CI environments.
If your build environment uses high-speed storage, you can adjust the thread count via the `RSPACK_BLOCKING_THREADS` environment variable to improve parallelism and potentially reduce build time, for example:
```bash
# Need to install cross-env package to set environment variables
cross-env RSPACK_BLOCKING_THREADS=8 rspack build
```
After setting the variable, observe the build time to find the most suitable configuration.
On slower or high-latency file systems, it's recommended to keep the default value or even lower it to avoid thread contention.
## Working thread pool size
Rspack internally uses a Tokio thread pool and Rayon thread pool to handle CPU bound tasks (Tokio for async tasks and Rayon for sync tasks). By default, Tokio and Rayon automatically determines the number of worker threads based on the number of CPU cores available.
If it consumes too much CPU resources during the build process, you can limit the number of worker threads by setting the `TOKIO_WORKER_THREADS` and `RAYON_NUM_THREADS` environment variable, for example:
```bash
# Need to install cross-env package to set environment variables
cross-env TOKIO_WORKER_THREADS=4 RAYON_NUM_THREADS=4 rspack build
```
Be aware that setting this value too low may lead to longer build times. After setting the variable, observe the build time to find the most suitable configuration.
---
url: /guide/optimization/tree-shaking.md
---
# Tree shaking
Rspack supports [tree shaking](https://developer.mozilla.org/en-US/docs/Glossary/Tree_shaking), a term commonly used in the JavaScript ecosystem for removing unused code, also known as "dead code". Dead code occurs when module exports are unused and have no side effects, allowing them to be safely removed to reduce bundle size.
## What is tree shaking
Think of your application as a tree. The source code and libraries you actually use are the green, living leaves. Dead code is like the brown, dead leaves consumed by autumn. To remove the dead leaves, you shake the tree and they fall off.
Rspack doesn't directly remove dead code—it marks unused exports as potential "dead code". Minification tools then recognize and process these markers. If [minimize](/config/optimization#optimizationminimize) is disabled, you won't see any actual code removal.
:::tip What is dead code
[Dead code](https://en.wikipedia.org/wiki/Dead_code) is code that's no longer executed, typically due to refactoring, optimization, or logical errors. It may be a remnant from previous versions or code that never executes under any condition.
:::
## Prerequisites
To effectively leverage tree shaking, you need to:
- Set Rspack's [mode](/config/mode) to `production` to enable tree shaking optimizations.
- In production builds, `mode` defaults to `production`.
- Use ES module syntax (`import` and `export`).
- When using compilers like SWC or Babel, ensure they don't transform ES modules to CommonJS.
- For example, in [@babel/preset-env](https://babeljs.io/docs/en/babel-preset-env), set `modules` to `false`.
## Configurations
When [mode](/config/mode) is set to `production`, Rspack enables several tree shaking optimizations:
- [usedExports](/config/optimization#optimizationusedexports): Detects which module exports are used, enabling removal of unused exports.
- [sideEffects](/config/optimization#optimizationsideeffects): Analyzes modules for side effects. Modules without side effects can be further optimized through re-exports.
- [providedExports](/config/optimization#optimizationprovidedExports): Analyzes all exports and tracks their re-export sources.
- [innerGraph](/config/optimization#optimizationsinnergraph): Tracks variable usage to more accurately determine if exports are actually used.
The following examples illustrate how these options work. For clarity, we'll use simplified code to demonstrate code removal.
Let's look at an example with `src/main.js` as the entry point:
```js title='src/main.js'
import { foo } from './util.js';
console.log(foo);
// `bar` is not used
```
```js title='src/util.js'
export const foo = 1;
export const bar = 2;
```
In this example, `bar` from `util.js` is unused. In `production` mode, Rspack enables [usedExports](/config/optimization#optimizationusedexports) by default, which detects which exports are used. Unused exports like `bar` are removed. The final output looks like this:
```js title='dist/main.js'
const foo = 1;
console.log(foo);
```
## Side effects analysis
In `production` mode, Rspack also analyzes modules for side effects. If all exports from a module are unused and the module has no side effects, the entire module can be removed. Let's modify the previous example:
```diff title='src/main.js'
import { foo } from './util.js';
- console.log(foo);
// `bar` is not used
```
In this case, none of the exports from `util.js` are used, and it’s analyzed as having no side effects, permitting the entire deletion of `util.js`.
You can manually indicate whether a module has side effects via `package.json` or `module.rules`. To do this, enable [optimization.sideEffects](/config/optimization#optimizationsideeffects).
In `package.json`, you can use `true` or `false` to indicate whether all modules in the package have side effects.
```json title="package.json"
{
"name": "package",
"version": "1.0.0",
"sideEffects": false
}
```
This `package.json` indicates that all modules in this package are side-effect-free.
You can also use glob patterns to specify which modules have side effects. Unmatched modules are automatically treated as side-effect-free. If you manually mark side effects, ensure all unmarked modules truly have no side effects.
```json title="package.json"
{
"name": "package",
"version": "1.0.0",
"sideEffects": ["./src/main.js", "*.css"]
}
```
This `package.json` indicates that only `./src/main.js` and all `.css` files have side effects, while all other modules are side-effect-free.
## Re-export analysis
Re-exports are common in development. However, a module might import many other modules while only needing a few exports. Rspack optimizes this by allowing consumers to access the actual exported modules directly. Consider this re-export example:
```js title='src/main.js'
import { value } from './re-exports.js';
console.log(value);
```
```js title='src/re-exports.js'
export * from './value.js';
export * from './other.js'; // this can be removed if `other.js` does not have any side effects
```
```js title='src/value.js'
export const value = 42;
export const foo = 42; // not used
```
Rspack enables [providedExports](/config/optimization#optimizationprovidedexports) by default, which analyzes all exports from a re-exporting module and identifies their origins.
If `src/re-exports.js` has no side effects, Rspack can convert the import in `src/main.js` to import directly from `src/value.js`:
```diff title='src/main.js'
- import { value } from './re-exports.js';
+ import { value } from './value.js';
console.log(value);
```
This allows Rspack to completely skip the `src/re-exports.js` module.
By analyzing all re-exports in `src/re-exports.js`, Rspack determines that `foo` from `src/value.js` is unused and removes it from the final output.
## Variable transmission
Sometimes exports are imported but not actually used. For example:
```js title='src/main.js'
import { foo } from './value.js';
function log() {
console.log(foo);
} // `log` is not used
const bar = foo; // `foo` is not used
```
In this scenario, even though the `log` function and the `bar` variable depend on `foo`, neither is used, so `foo` is considered dead code and removed.
When [innerGraph](/config/optimization#optimizationinnergraph) is enabled (the default in `production` mode), Rspack can track variable usage across modules to achieve precise code optimization.
```js title='src/main.js'
import { value } from './bar.js';
console.log(value);
```
```js title='src/bar.js'
import { foo } from './foo.js';
const bar = foo;
export const value = bar;
```
```js title='src/foo.js'
export const foo = 42;
```
Since `value` is used, the `foo` it depends on is retained.
## Pure annotation
Use the [`/*#__PURE__*/`](https://github.com/javascript-compiler-hints/compiler-notations-spec/blob/main/pure-notation-spec.md) annotation to tell Rspack that a function call is side-effect-free (pure). Place it before function calls to mark them as having no side effects.
When an unused variable's initial value is marked as side-effect-free (pure), it's treated as dead code and removed by the minimizer.
```js
/*#__PURE__*/ double(55);
```
:::tip
- Function arguments aren't marked by the annotation and may need to be marked individually.
- This behavior is enabled when [optimization.innerGraph](/config/optimization#optimizationinnergraph) is set to true.
:::
---
url: /guide/optimization/use-rsdoctor.md
---
# Use Rsdoctor
[Rsdoctor](https://rsdoctor.rs/) is a build analyzer tailored for the Rspack ecosystem.
Rsdoctor is committed to being a one-stop, intelligent build analyzer that makes the build process transparent, predictable, and optimizable through visualization and smart analysis, helping development teams precisely identify bottlenecks, optimize performance, and improve engineering quality.
If you need to debug the build outputs or build process, you can use Rsdoctor for troubleshooting.
## How to use
In an Rspack project, you can enable Rsdoctor by following these steps:
1. Install the `@rsdoctor/rspack-plugin` plugin:
import { PackageManagerTabs } from '@theme';
2. Register the `RsdoctorRspackPlugin` plugin in the [plugins](/config/plugins) option of Rspack:
```ts title="rspack.config.mjs"
import { RsdoctorRspackPlugin } from '@rsdoctor/rspack-plugin';
export default {
plugins: [
// Register the plugin only when RSDOCTOR is true, as the plugin increases build time
process.env.RSDOCTOR &&
new RsdoctorRspackPlugin({
// plugin options
}),
],
};
```
3. Add the `RSDOCTOR=true` variable before the build command:
```bash
# dev
RSDOCTOR=true rspack serve
# build
RSDOCTOR=true rspack build
```
As Windows does not support the above usage, you can also use [cross-env](https://npmjs.com/package/cross-env) to set environment variables. This ensures compatibility across different systems:
```bash
# dev
cross-env RSDOCTOR=true rspack serve
# build
cross-env RSDOCTOR=true rspack build
```
Rsdoctor will open the build analysis page after the build is complete. For complete features, please refer to [Rsdoctor documentation](https://rsdoctor.rs/).
## Configure Rsdoctor
See the [Options](https://rsdoctor.rs/config/options/options) documentation of Rsdoctor to configure the options of the RsdoctorRspackPlugin.
## More features
See the [Rsdoctor features](https://rsdoctor.rs/guide/start/features) to learn about all the features of Rsdoctor.
---
url: /guide/migration/webpack.md
---
import { PackageManagerTabs } from '@theme';
# Migrate from webpack
Rspack's configuration is designed based on webpack, enabling you to migrate your project from webpack to Rspack with ease.
This document is primarily aimed at projects using webpack 5. Since Rspack's API and configuration align with webpack 5.
For projects not using webpack 5, there are other migration guides that can be referenced:
- For projects using webpack v4 or earlier versions, you can refer to [webpack - To v5 from v4](https://webpack.js.org/migrate/5/) to understand the differences.
- For projects using create-react-app or CRACO, you can refer to [Migrating Create React App](/guide/migration/cra).
- For projects using Vue CLI, you can refer to [Rsbuild - Migrating from Vue CLI](https://rsbuild.rs/guide/migration/vue-cli).
## Installing Rspack
In your project directory, install Rspack as a `devDependencies`:
Now you can remove the webpack-related dependencies from your project:
:::tip
In some cases, you will still need to keep `webpack` as a dev dependency, such as when using [vue-loader](https://github.com/vuejs/vue-loader) (you can use [rspack-vue-loader](https://github.com/rstackjs/rspack-vue-loader) instead).
This is because these packages directly `import` subpaths of webpack and couple with webpack. If you encounter this issue, you can provide feedback to the maintainers of these plugins, asking them if they can make `webpack` an optional dependency.
:::
## Updating package.json
Update your build scripts to use Rspack instead of webpack:
```diff title="package.json"
{
"scripts": {
- "serve": "webpack serve",
- "build": "webpack build",
+ "serve": "rspack serve",
+ "build": "rspack build",
}
}
```
## Updating configuration
Rename the `webpack.config.js` file to `rspack.config.js`.
:::tip
Rspack commands can specify the configuration file with `-c` or `--config`, similar to webpack commands.
However, unlike webpack, if a configuration file is not explicitly specified, Rspack defaults to using `rspack.config.js`.
:::
Rspack is actively working on implementing webpack's upcoming features, so some configuration defaults differ from webpack 5, as shown below:
| Configuration | webpack Default | Rspack Default |
| ----------------- | --------------- | -------------- |
| node.global | true | 'warn' |
| node.\_\_filename | 'mock' | 'warn-mock' |
| node.\_\_dirname | 'mock' | 'warn-mock' |
You can refer to [Configure Rspack](/config/index) to see the configurations supported by Rspack.
## Webpack built-in plugins
Rspack has implemented most of webpack's built-in plugins, with the same names and configuration parameters, allowing for easy replacement.
For example, replacing the [DefinePlugin](/plugins/webpack/define-plugin):
```diff title="rspack.config.js"
- const webpack = require('webpack');
+ const { rspack } = require('@rspack/core');
module.exports = {
//...
plugins: [
- new webpack.DefinePlugin({
+ new rspack.DefinePlugin({
// ...
}),
],
}
```
See [Webpack-aligned built-in plugins](/plugins/webpack/index) for more information about supported webpack plugins in Rspack.
## Community plugins
Rspack supports most of the webpack community plugins and also offers alternative solutions for some currently unsupported plugins.
Check [Plugin compat](/guide/compatibility/plugin) for more information on Rspack's compatibility with popular webpack community plugins.
### `copy-webpack-plugin`
Use [rspack.CopyRspackPlugin](/plugins/rspack/copy-rspack-plugin) instead of [copy-webpack-plugin](https://github.com/webpack/copy-webpack-plugin):
```diff title="rspack.config.js"
- const CopyWebpackPlugin = require('copy-webpack-plugin');
+ const { rspack } = require('@rspack/core');
module.exports = {
plugins: [
- new CopyWebpackPlugin({
+ new rspack.CopyRspackPlugin({
// ...
}),
]
}
```
### `mini-css-extract-plugin`
Use [rspack.CssExtractRspackPlugin](/plugins/rspack/css-extract-rspack-plugin) instead of [mini-css-extract-plugin](https://github.com/webpack/mini-css-extract-plugin):
```diff title="rspack.config.js"
- const CssExtractWebpackPlugin = require('mini-css-extract-plugin');
+ const { rspack } = require('@rspack/core');
module.exports = {
plugins: [
- new CssExtractWebpackPlugin({
+ new rspack.CssExtractRspackPlugin({
// ...
}),
]
module: {
rules: [
{
test: /\.css$/i,
use: [
- CssExtractWebpackPlugin.loader,
+ rspack.CssExtractRspackPlugin.loader,
"css-loader"
],
+ type: 'javascript/auto'
}
]
}
}
```
### `tsconfig-paths-webpack-plugin`
Use [resolve.tsConfig](/config/resolve#resolvetsconfig) instead of [tsconfig-paths-webpack-plugin](https://github.com/dividab/tsconfig-paths-webpack-plugin):
```diff title="rspack.config.js"
- const TsconfigPathsPlugin = require('tsconfig-paths-webpack-plugin');
module.exports = {
resolve: {
- plugins: [new TsconfigPathsPlugin({})]
+ tsConfig: {}
}
}
```
### `fork-ts-checker-webpack-plugin`
Use [ts-checker-rspack-plugin](https://github.com/rstackjs/ts-checker-rspack-plugin) instead of [fork-ts-checker-webpack-plugin](https://github.com/TypeStrong/fork-ts-checker-webpack-plugin):
```diff title="rspack.config.js"
- const ForkTsCheckerWebpackPlugin = require('fork-ts-checker-webpack-plugin');
+ const { TsCheckerRspackPlugin } = require('ts-checker-rspack-plugin');
module.exports = {
plugins: [
- new ForkTsCheckerWebpackPlugin()
+ new TsCheckerRspackPlugin()
]
}
```
## Loaders
Rspack's loader runner is fully compatible with webpack's loader functionality, supporting the vast majority of webpack loaders.
You can use your existing loaders without any changes. However, to achieve the best performance, consider migrating the following loaders:
### [babel-loader](https://github.com/babel/babel-loader) / [swc-loader](https://swc.rs/docs/usage/swc-loader) → builtin:swc-loader
Using `builtin:swc-loader` offers better performance compared to the `babel-loader` and the external `swc-loader`, as it avoids frequent communication between JavaScript and Rust.
If you need custom transformation logic using Babel plugins, you can retain `babel-loader`, but it is recommended to limit its use to fewer files to prevent significant performance degradation.
```diff title="rspack.config.js"
module.exports = {
module: {
rules: [
- {
- test: /\.tsx?$/i,
- use: [
- {
- loader: 'babel-loader',
- options: {
- presets: ['@babel/preset-typescript'],
- },
- },
- ],
- test: /\.jsx?$/i,
- use: [
- {
- loader: 'babel-loader',
- options: {
- presets: ['@babel/preset-react'],
- },
- },
- ],
- },
+ {
+ test: /\.(j|t)s$/,
+ exclude: [/[\\/]node_modules[\\/]/],
+ loader: 'builtin:swc-loader',
+ options: {
+ jsc: {
+ parser: {
+ syntax: 'typescript',
+ },
+ externalHelpers: true,
+ transform: {
+ react: {
+ runtime: 'automatic',
+ development: !prod,
+ refresh: !prod,
+ },
+ },
+ },
+ env: {
+ targets: 'Chrome >= 48',
+ },
+ },
+ },
+ {
+ test: /\.(j|t)sx$/,
+ loader: 'builtin:swc-loader',
+ exclude: [/[\\/]node_modules[\\/]/],
+ options: {
+ jsc: {
+ parser: {
+ syntax: 'typescript',
+ tsx: true,
+ },
+ transform: {
+ react: {
+ runtime: 'automatic',
+ development: !prod,
+ refresh: !prod,
+ },
+ },
+ externalHelpers: true,
+ },
+ env: {
+ targets: 'Chrome >= 48', // browser compatibility
+ },
+ },
+ },
],
},
};
```
### [file-loader](https://github.com/webpack-contrib/raw-loader) / [url-loader](https://github.com/webpack-contrib/url-loader) / [raw-loader](https://github.com/webpack-contrib/raw-loader) → [Asset Modules](/guide/features/asset-module)
Rspack implements webpack 5's [Asset Modules](https://webpack.js.org/guides/asset-modules), using asset modules to replace `file-loader`, `url-loader`, and `raw-loader` for better performance.
#### file-loader → asset/resource
```diff title="rspack.config.js"
module.exports = {
module: {
rules: [
- {
- test: /\.(png|jpe?g|gif)$/i,
- use: ["file-loader"],
- },
+ {
+ test: /\.(png|jpe?g|gif)$/i,
+ type: "asset/resource",
+ },
],
},
};
```
#### url-loader → asset/inline
```diff title="rspack.config.js"
module.exports = {
module: {
rules: [
- {
- test: /\.(png|jpe?g|gif)$/i,
- use: ["url-loader"],
- },
+ {
+ test: /\.(png|jpe?g|gif)$/i,
+ type: "asset/inline",
+ },
],
},
};
```
#### raw-loader → asset/source
```diff title="rspack.config.js"
module.exports = {
module: {
rules: [
- {
- test: /^BUILD_ID$/,
- use: ["raw-loader",],
- },
+ {
+ test: /^BUILD_ID$/,
+ type: "asset/source",
+ },
],
},
};
```
---
url: /guide/migration/cra.md
---
# Migrate from Create React App
Since Create React App (CRA) comes with rich built-in capabilities, it would be challenging to manually set up an equivalent configuration using Rspack CLI. Therefore, we recommend migrating your CRA application to [Rsbuild](https://rsbuild.rs/) to leverage Rspack's capabilities out of the box.
## What is Rsbuild
Rsbuild is a high-performance build tool powered by Rspack. It provides a set of thoughtfully designed default build configs, offering an out-of-the-box development experience and can fully unleash the performance advantages of Rspack.
Rsbuild provides rich build features, including the compilation of TypeScript, JSX, Sass, Less, CSS Modules, Wasm, and others. It also supports Module Federation, image compression, type checking, PostCSS, Lightning CSS, and more.
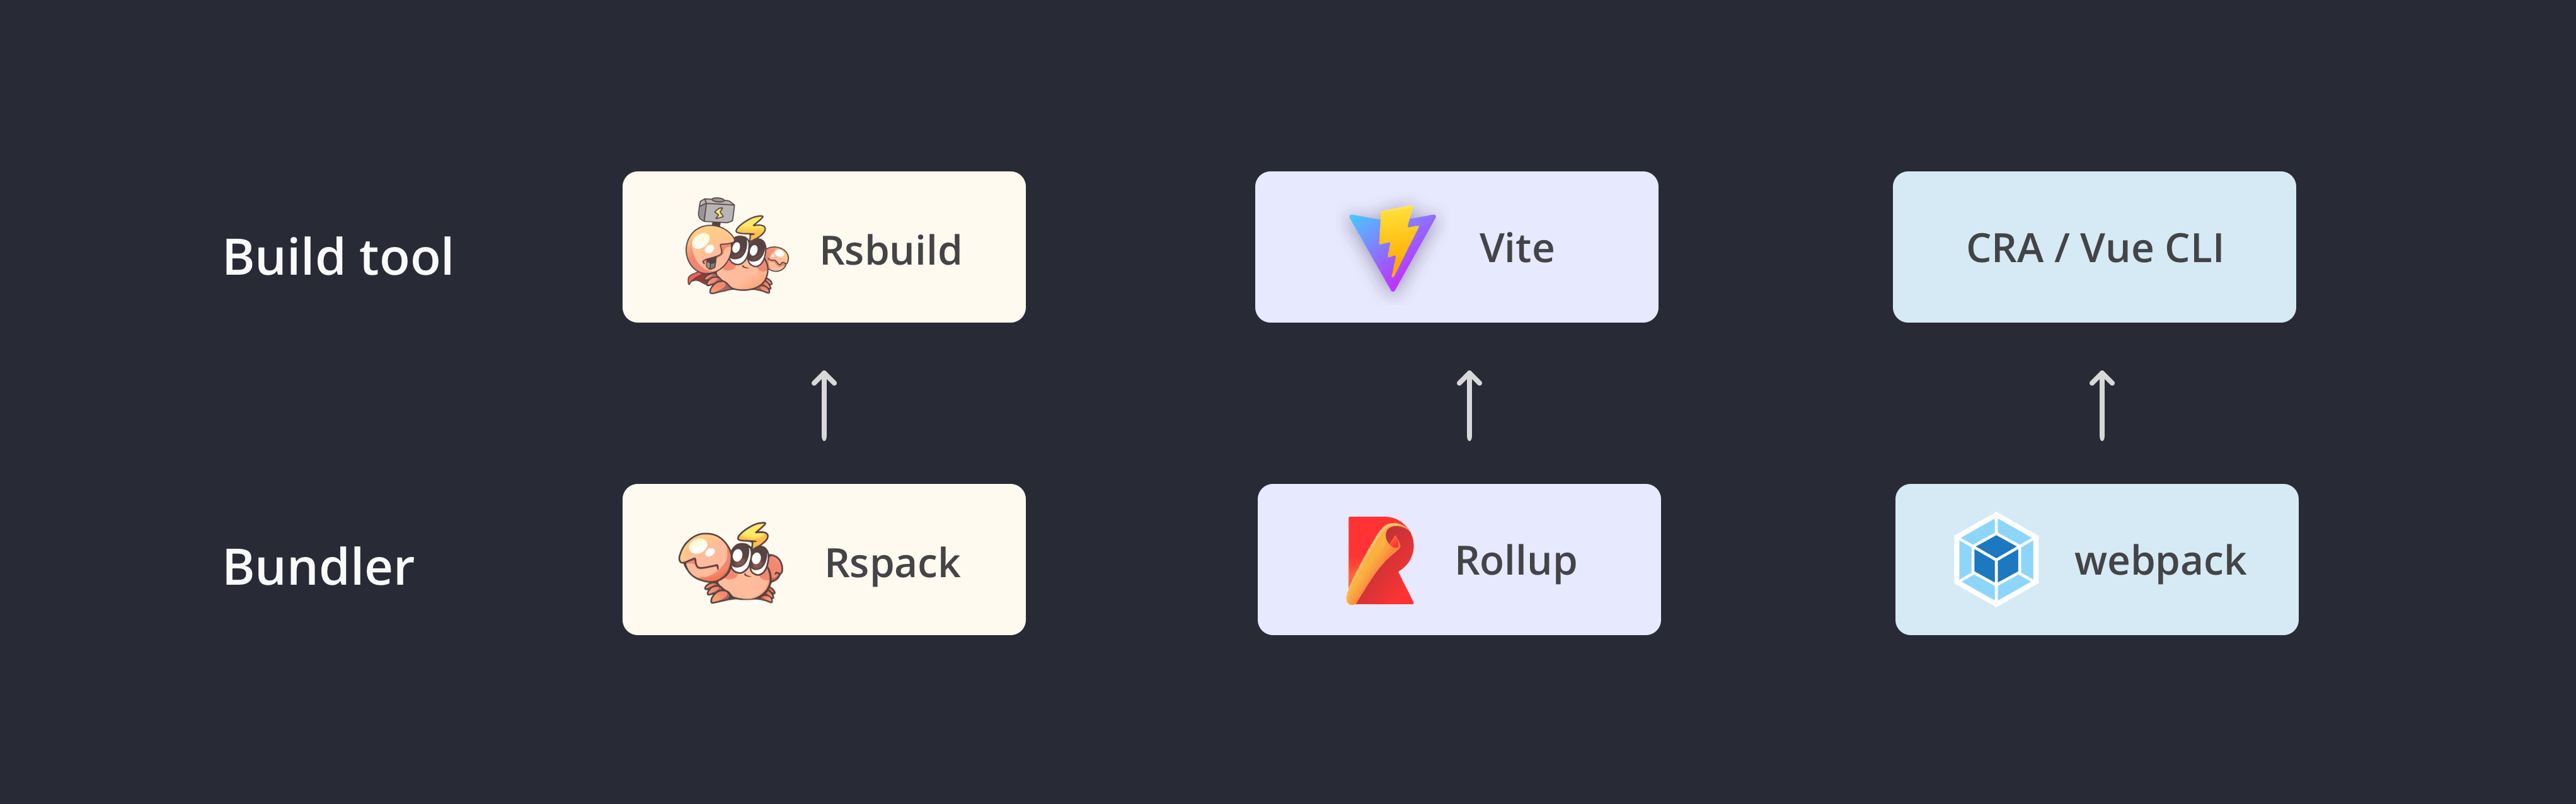
## How to migrate
Rsbuild provides a comprehensive migration guide to help you migrate from Create React App.
Please refer to the [Migration guide](https://rsbuild.rs/guide/migration/cra) for details.
---
url: /guide/migration/storybook.md
---
import { PackageManagerTabs } from '@theme';
# Migrate from Storybook webpack
If you are using React / Vue with [Storybook](https://storybook.js.org/) and building with webpack 5, you can replace the `@storybook/react-webpack5` build with [storybook-rsbuild](https://github.com/rstackjs/storybook-rsbuild), which is implemented based on Rsbuild and uses Rspack as the underlying bundler. It supports out-of-the-box use, and the documentation can be found at [storybook-rsbuild](https://github.com/rstackjs/storybook-rsbuild).
Next, we will take React as an example to introduce how to migrate a Storybook webpack 5 project. The migration steps for Vue projects are similar to React.
:::info
Storybook Rsbuild requires at least version 8.0 of Storybook. It's highly recommended to upgrade Storybook to the latest version, check Storybook 8's [release note](https://storybook.js.org/blog/storybook-8/) for detail changes and migration guide.
:::
## Update dependencies
First, replace `@storybook/react-webpack5` with [`storybook-react-rsbuild`](https://www.npmjs.com/package/storybook-react-rsbuild) (for Vue projects, use [`storybook-vue3-rsbuild`](https://www.npmjs.com/package/storybook-vue3-rsbuild)), add `@rsbuild/core` and `@rsbuild/plugin-react` (for Vue projects, use `@rsbuild/plugin-vue`).
## Configure Rsbuild
Storybook Rsbuild will automatically load the Rsbuild configuration file from the working directory. Install [`@rsbuild/plugin-react`](https://rsbuild.rs/guide/framework/react) (for Vue projects, install and use [`@rsbuild/plugin-vue`](https://rsbuild.rs/guide/framework/vue#vue-3)).
```js
import { defineConfig } from '@rsbuild/core';
import { pluginReact } from '@rsbuild/plugin-react';
export default defineConfig({
plugins: [pluginReact()],
});
```
## Update Storybook configuration
Refer to the following configuration to modify the `main.js` configuration of Storybook, and specify `'storybook-react-rsbuild'` as the Storybook framework (for Vue projects, use `'storybook-vue3-rsbuild'`).
```diff title=.storybook/main.js
export default {
- framework: '@storybook/react-webpack5'
+ framework: 'storybook-react-rsbuild',
},
```
## Examples
The [rstackjs/storybook-rsbuild](https://github.com/rstackjs/storybook-rsbuild/tree/main/sandboxes) repository provides examples of Storybook for React / Vue projects.
## Limitations
Rspack is gradually improving full support for Storybook. Currently, there are some capabilities that are not supported, see [storybook-rsbuild - Roadmap](https://github.com/rstackjs/storybook-rsbuild#roadmap) for details.
---
url: /guide/migration/rspack_0.x.md
---
# Migrating from Rspack 0.x
The document lists all breaking changes from Rspack v0.7 to v1.0. You can refer to this document for migration.
> See [Breaking changes in Rspack v1.0.0](https://github.com/web-infra-dev/rspack/discussions/6626) for details.
## Configuration default value adjustments
In Rspack 1.x, we have aligned the default configuration values with those of Webpack.
### [Important] experiments.css
The default value of [experiments.css](/config/experiments#experimentscss) has been changed from `true` to `false`.
In Rspack 0.x, `experiments.css` was enabled by default, which means files ending with`*.css`were automatically treated as`type: 'css/auto'` without needing to manually include other loaders to process CSS files.
If you rely on the built-in feature to handle CSS files without using any loaders, or if you have used the following configuration to handle CSS files:
```js title="rspack.config.mjs"
export default {
module: {
rules: [
{
test: /\.less$/,
type: 'css/auto', // 👈
use: ['less-loader'],
},
],
},
};
```
Please note that you now need to manually enable `experiments.css`.
### [Important] optimization.concatenateModules
The default value of [optimization.concatenateModules](/config/optimization#optimizationconcatenatemodules) has been changed from `false` to:
- `true` when `mode` is `'production'`.
- `false` for other values of `mode`.
In Rspack 1.x, module concatenation optimization has become more stable. Thus, it's now enabled by default in production mode, allowing multiple modules to be concatenated into a single module to reduce output size and improve compression efficiency.
### devtool
The default value of [devtool](/config/devtool) has been changed from `false` to:
- `eval` when `mode` is `'development'`.
- `false` for other values of `mode`.
> `@rspack/cli` overrides the default `devtool` value from `@rspack/core`. Therefore, if you are using `@rspack/cli`, this change will not affect you.
### experiments.asyncWebAssembly
The default value of [experiments.asyncWebAssembly](/config/experiments#experimentsasyncwebassembly) has been changed from `false` to depend on the `experiments.futureDefaults` configuration. It is enabled by default only when `experiments.futureDefaults` is set to `true`.
If you are using WebAssembly modules as asynchronous modules, you now need to manually set `experiments.asyncWebAssembly` to `true`.
### splitChunks.cacheGroups.\{cacheGroup\}.reuseExistingChunk
The default value of [splitChunks.cacheGroups.\{cacheGroup\}.reuseExistingChunk](/plugins/webpack/split-chunks-plugin#splitchunkscachegroupscachegroupreuseexistingchunk) has been changed from `true` to `false`.
### optimization.moduleIds
The default value of [optimization.moduleIds](/config/optimization#optimizationmoduleids) has been changed to `'natural'` when `mode` is `none`.
### optimization.chunkIds
The default value of [optimization.chunkIds](/config/optimization#optimizationchunkids) has been changed to `'natural'` when `mode` is `none`.
## Removed configurations
### [Important] Removed resolve.tsConfigPath
Please use [resolve.tsConfig](/config/resolve#resolvetsconfig) instead.
```diff
export default {
resolve: {
- tsConfigPath: path.resolve(__dirname, './tsconfig.json'),
+ tsConfig: path.resolve(__dirname, './tsconfig.json'),
},
};
```
### output.amdContainer
Please use [output.library.amdContainer](/config/output#outputlibraryamdcontainer) instead.
## Adjustments to builtin:swc-loader
To streamline the core, Rspack 1.x has removed the built-in SWC plugins. You now need to manually include them.
### [Important] Removed rspackExperiments.styledComponents
Use [@swc/plugin-styled-components](https://www.npmjs.com/package/@swc/plugin-styled-components) instead.
```diff
export default {
module: {
rules: [
{
test: /\.jsx$/,
loader: "builtin:swc-loader",
options: {
- rspackExperiments: {
- styledComponents: true,
- },
jsc: {
+ experimental: {
+ plugins: [["@swc/plugin-styled-components", {}]],
+ },
},
},
},
],
},
};
```
### [Important] Removed rspackExperiments.emotion
Use [@swc/plugin-emotion](https://www.npmjs.com/package/@swc/plugin-emotion) instead.
```diff
export default {
module: {
rules: [
{
test: /\.jsx$/,
loader: "builtin:swc-loader",
options: {
- rspackExperiments: {
- emotion: true,
- },
jsc: {
+ experimental: {
+ plugins: [["@swc/plugin-emotion", {}]],
+ },
},
},
},
],
},
};
```
### [Important] Removed rspackExperiments.relay
Use [@swc/plugin-relay](https://www.npmjs.com/package/@swc/plugin-relay) instead.
```diff
export default {
module: {
rules: [
{
test: /\.jsx$/,
loader: "builtin:swc-loader",
options: {
- rspackExperiments: {
- relay: true,
- },
jsc: {
+ experimental: {
+ plugins: [["@swc/plugin-relay", {}]],
+ },
},
},
},
],
},
};
```
### [Important] Removed rspackExperiments.preact
Use [@swc/plugin-prefresh](https://www.npmjs.com/package/@swc/plugin-prefresh) instead.
```diff
export default {
module: {
rules: [
{
test: /\.jsx$/,
loader: "builtin:swc-loader",
options: {
- rspackExperiments: {
- preact: true,
- },
jsc: {
+ experimental: {
+ plugins: [["@swc/plugin-prefresh", {}]],
+ },
},
},
},
],
},
};
```
## Adjustments to built-in plugins
### [Important] CSS minimizer plugin adjustment
In Rspack 0.x, we used the built-in `rspack.SwcCssMinimizerRspackPlugin` to compress CSS size.
Now, we have removed it and replaced it with [rspack.LightningCssMinimizerRspackPlugin](/plugins/rspack/lightning-css-minimizer-rspack-plugin) to handle the same functionality.
If you previously manually registered and configured `rspack.SwcCssMinimizerRspackPlugin`, you should to switch to `rspack.LightningCssMinimizerRspackPlugin`:
```diff
import { rspack } from '@rspack/core';
export default {
optimization: {
minimizer: [
- new rspack.SwcCssMinimizerRspackPlugin({
+ new rspack.LightningCssMinimizerRspackPlugin({
// options
}),
],
},
};
```
### rspack.SwcJsMinimizerRspackPlugin
Rspack's built-in and default-enabled JavaScript minimizer plugin has had its configuration aligned with [SWC's minification configuration](https://swc.rs/docs/configuration/minification). The breaking changes are as follows:
- `minimizerOptions.passes`: moved to `minimizerOptions.compress.passes`
- `minimizerOptions.dropConsole`: moved to `minimizerOptions.compress.drop_console`
- `minimizerOptions.pureFuncs`: moved to `minimizerOptions.compress.pure_funcs`
- `minimizerOptions.keepClassNames`: moved to `minimizerOptions.mangle.keep_classnames`
- `minimizerOptions.keepFnNames`: moved to `minimizerOptions.mangle.keep_fnames`
- `minimizerOptions.comments`: moved to `minimizerOptions.format.comments`
- `minimizerOptions.asciiOnly`: moved to `minimizerOptions.format.ascii_only`
Default value changes:
- `comments` (`options.format.comments`): changed from `false` to `"some"`
### rspack.HtmlRspackPlugin
We have aligned its configuration with [html-webpack-plugin](https://www.npmjs.com/package/html-webpack-plugin), with the following breaking changes:
- `excludedChunks` has been renamed to `excludeChunks`
- When `mode` is `'production'`, `minify` is now `true` by default
## Other changes
### [Important] @rspack/cli
`@rspack/cli` has upgraded its dependency on `webpack-dev-server` from v4 to v5. If you are using `@rspack/cli`, please be aware of the following breaking changes:
- The minimum supported Node.js version for webpack-dev-server v5 is 18.12.0.
- Several configuration options have changed. Please refer to the [webpack-dev-server v5 migration guide](https://github.com/webpack/webpack-dev-server/blob/master/migration-v5.md).
### [Important] `ResolverFactory` and `Resolver` refactoring with Rust
`ResolverFactory` and `Resolver` have been refactored with Rust to unify the implementations on the JS and Rust sides. Due to this change, `ResolverFactory` and `Resolver` currently do not support any hooks.
Additionally, `Resolver` now only supports the following methods:
- `resolveSync`
- `resolve`
- `withOptions`
This change might cause some plugins to become unusable.
:::tip
Rspack supports the [NormalModuleFactory](/api/plugin-api/normal-module-factory-hooks)'s [resolve](/api/plugin-api/normal-module-factory-hooks#resolve) hook. In most cases, you can use this hook as a replacement for the `Resolver`'s `resolve` hook to achieve the same functionality.
```js
compiler.hooks.normalModuleFactory.tap('PLUGIN', (normalModuleFactory) => {
normalModuleFactory.hooks.resolve.tap('PLUGIN', (data) => {
// Redirect the module
if (data.request === './foo.js') {
data.request = './bar.js';
}
});
});
```
:::
---
url: /guide/compatibility/plugin.md
---
import { CommunityPluginCompatibleTable } from '@components/CommunityCompatibleTable.tsx';
# Plugin compatibility
This page lists the compatibility status of common community plugins in Rspack.
For details on Rspack's support for webpack built-in plugins, see [Webpack-aligned built-in plugins](/plugins/webpack/index).
The table only covers common community plugins. For others, you can verify their functionality yourself, and you're welcome to add them to this page.
You can view examples of common plugins at [rstack-examples](https://github.com/rstackjs/rstack-examples).
Additionally, you can check out the community Rspack plugins at [awesome-rstack](https://github.com/rstackjs/awesome-rstack).
---
url: /misc/branding/guideline.md
---
# Branding guideline
Here you can find the branding guideline, assets and license for the project.
## The name
When used standalone, Rspack should always be written as Rspack, not rspack or RSPACK or RSPack. However, lowercase letters can be used in command lines or package names, such as `@rspack/cli`.
## Rspack logo
Rspack logo is a small crab as fast as lightning, representing fast compilation of Rspack.
## Design resources
You can find all of Rspack's design resources under the [rstack-design-resources](https://github.com/rstackjs/rstack-design-resources) repository.
The design resources of Rspack are licensed under the [Creative Commons Attribution-NonCommercial-ShareAlike 4.0 International](https://creativecommons.org/licenses/by-nc-sa/4.0/deed.en) license.
---
url: /config/index.md
---
import { PackageManagerTabs } from '@theme';
import { Tabs, Tab } from '@theme';
# Configure Rspack
Rspack provides configurations similar to webpack. This chapter will show you how to use the Rspack configuration.
## Configuration file
When you run the Rspack CLI, Rspack automatically reads the `rspack.config.*` file in the current working directory.
A basic Rspack configuration file looks like this:
```js title="rspack.config.mjs"
import { defineConfig } from '@rspack/cli';
export default defineConfig({
entry: {
main: './src/index.js',
},
});
```
```js title="rspack.config.cjs"
const { defineConfig } = require('@rspack/cli');
module.exports = defineConfig({
entry: {
main: './src/index.js',
},
});
```
```ts title="rspack.config.ts"
import { defineConfig } from '@rspack/cli';
export default defineConfig({
entry: {
main: './src/index.js',
},
});
```
## Configuration file formats
Rspack supports these configuration file formats:
- `rspack.config.js`: defaults to `CommonJS` format, or `ES modules` format if the type of the package.json is "module".
- `rspack.config.ts`: `TypeScript` format, see [TypeScript configuration file](#typescript-configuration-file) for more details.
- `rspack.config.cjs`: Forced to `CommonJS` format.
- `rspack.config.mjs`: Forced to `ES modules` format.
Note that Rspack will first search JS configuration file and then TS configuration file.
> See [ES modules](https://nodejs.org/api/esm.html#modules-ecmascript-modules) and [CommonJS](https://nodejs.org/api/modules.html) for the difference between `CommonJS` and `ES modules`.
## Extending configurations
See [Extending Configurations](./extends.mdx) for details on how to extend configurations from other files or packages.
## TypeScript configuration file
When using `rspack.config.ts`, you can choose from one of the following approaches:
### Default behavior
Starting from v1.5.0, Rspack CLI has built-in support for TypeScript configuration, using SWC by default to transform TypeScript code into CommonJS format JavaScript code.
If you're using a Rspack CLI earlier than v1.5.0, it's recommended to upgrade to the latest version. You no longer need to load configuration files through `ts-node` or `esbuild-register`, and these dependencies can be removed.
### Native support
If your JavaScript runtime already natively supports TypeScript, you can use the built-in TS transformation to load the configuration file, ensuring that module resolution behavior is consistent with native behavior.
For example, Node.js already natively supports TypeScript, you can use the following command to use the Node.js native loader to load the configuration file:
- For Node.js v22.18+ and v24.3+ which support native TypeScript by default, you can run the following command to load the TS config:
```json title="package.json"
{
"scripts": {
"build": "rspack build --configLoader=native"
}
}
```
See [Node.js - Running TypeScript Natively](https://nodejs.org/en/learn/typescript/run-natively#running-typescript-natively) for more details.
### Using esbuild
For lower Node.js versions, you can use `esbuild-register` to load the configuration file.
Install [esbuild](https://npmjs.com/package/esbuild) and [esbuild-register](https://npmjs.com/package/esbuild-register), no additional configuration is needed.
### Using ts-node
You can also use [ts-node](https://npmjs.com/package/ts-node) to load the configuration file.
1. Install `ts-node`:
2. Then configure `ts-node` to use `CommonJS` modules in `tsconfig.json`:
```json title="tsconfig.json"
{
"ts-node": {
"compilerOptions": {
"module": "CommonJS"
}
}
}
```
## Type checking
Use the `defineConfig` helper to enable auto-completion. For JavaScript configuration files, you can use the `// @ts-check` comment to enable type checking.
```ts title="rspack.config.ts"
import { defineConfig } from '@rspack/cli';
export default defineConfig({
entry: {
main: './src/index.js',
},
});
```
```js title="rspack.config.mjs"
// @ts-check
import { defineConfig } from '@rspack/cli';
export default defineConfig({
entry: {
main: './src/index.js',
},
});
```
Alternatively, you can use [JSDoc](https://jsdoc.app/) for type checking.
```js title="rspack.config.mjs"
// @ts-check
/** @type {import('@rspack/cli').Configuration} */
const config = {
entry: {
main: './src/index.js',
},
};
export default config;
```
## Specify the configuration file
Specify the name of the configuration file using the `--config` option.
For example, if you need to use the `rspack.prod.config.js` file when running build, you can add the following scripts to `package.json`:
```json title="package.json"
{
"scripts": {
"dev": "rspack serve",
"build": "rspack build --config rspack.prod.config.js"
}
}
```
Abbreviate the `--config` option to `-c`:
```bash
$ rspack build -c rspack.prod.config.js
```
## Exporting a configuration function
Rspack supports exporting a function in Rspack configuration file, you can dynamically compute the configuration in the function and return it to Rspack.
```js title="rspack.config.mjs"
export default function (env, argv) {
return {
devtool: env.production ? 'source-map' : 'eval',
};
}
```
As you can see from the example above, the function takes two input parameters:
- The first argument is `env`, which corresponds to the value of the `--env` option when running the CLI command.
- The second argument is `argv`, which contains all the options passed to the CLI.
### Determine the current environment
In addition to passing the `env` parameter, it is more common to use `process.env.NODE_ENV` to determine the current environment:
```js title="rspack.config.mjs"
export default function (env, argv) {
const isProduction = process.env.NODE_ENV === 'production';
return {
devtool: isProduction ? 'source-map' : 'eval',
};
}
```
## Merge configurations
Use Rspack's [extends](/config/extends) option or [webpack-merge](https://npmjs.com/package/webpack-merge) package to merge multiple Rspack configurations.
### extends option
When using [@rspack/cli](/api/cli), Rspack provides the `extends` option, allowing you to extend configurations from other files or packages.
```js title="rspack.config.mjs"
export default {
extends: './base.rspack.config.mjs',
output: {
filename: '[name].bundle.js',
},
};
```
> This option is only supported in `@rspack/cli`, see [extends](/config/extends) for more usage.
### webpack-merge
`webpack-merge` is a community library for merging multiple webpack configurations, and it can also be used to merge Rspack configurations.
First install `webpack-merge`:
Then you can use its `merge` function to merge configurations:
```js title="rspack.config.mjs"
import { merge } from 'webpack-merge';
const isDev = process.env.NODE_ENV === 'development';
const base = {};
const dev = {
plugins: [new SomeDevPlugin()],
};
export default isDev ? merge(base, dev) : base;
```
> See [webpack-merge documentation](https://npmjs.com/package/webpack-merge) for more details.
---
url: /config/filename-placeholders.md
---
# Filename placeholders
Rspack's filename-related options support placeholders. This lets you generate output filenames dynamically based on the current build context. It helps distinguish different assets and improves caching efficiency.
Different options support different types of placeholders. This page lists all placeholder types available in Rspack, and which filename options use which placeholder type.
## Example
For example, the `[contenthash]` placeholder generates a hash based on the file content. If the content does not change, the filename remains stable. This is ideal for long-term caching.
Here is an example showing how `[name]` and `[contenthash]` can be used in [output.filename](/config/output#outputfilename):
```js title="rspack.config.mjs"
const isProd = process.env.NODE_ENV === 'production';
export default {
entry: {
main: './src/main.js',
list: './src/list.js',
},
output: {
filename: isProd ? '[name].[contenthash].js' : '[name].js',
},
};
```
This outputs:
```
src/
├── main.js
└── list.js
dist/
├── main.abcdefghabcdefgh.js
└── list.qwertyuiqwertyui.js
```
## Filename options
The following table summarizes common filename options and the placeholder types they support:
| Option | Placeholder Types | Description |
| ---------------------------------------------------------------------------------- | ------------------------------ | ----------------------------- |
| [output.filename](/config/output#outputfilename) | Compilation, Chunk | Entry chunk filenames |
| [output.chunkFilename](/config/output#outputchunkfilename) | Chunk | Non-entry chunk filenames |
| [output.cssFilename](/config/output#outputcssfilename) | Compilation, Chunk | Entry CSS chunk filenames |
| [output.cssChunkFilename](/config/output#outputcsschunkfilename) | Chunk | Non-entry CSS chunk filenames |
| [output.assetModuleFilename](/config/output#outputassetmodulefilename) | File, Module | Static asset module filenames |
| [output.webassemblyModuleFilename](/config/output#outputwebassemblymodulefilename) | File, Module | WebAssembly module filenames |
| [output.hotUpdateMainFilename](/config/output#outputhotupdatemainfilename) | Only `[fullhash]`, `[runtime]` | HMR manifest filename |
| [output.hotUpdateChunkFilename](/config/output#outputhotupdatechunkfilename) | Only `[fullhash]`, `[id]` | HMR chunk filenames |
| [output.sourceMapFilename](/config/output#outputsourcemapfilename) | Compilation, Chunk, File | source map filenames |
## Placeholder types
### Compilation placeholders
Compilation placeholders expose information about the entire build process.
| Template | Description |
| ------------ | --------------------- |
| `[fullhash]` | Full compilation hash |
### Chunk placeholders
Chunk placeholders expose information about a specific chunk.
| Template | Description |
| --------------- | -------------------------------------------------------------------------------------------------------- |
| `[id]` | Chunk ID |
| `[name]` | Chunk name if available. Otherwise falls back to chunk ID |
| `[chunkhash]` | Hash of all content in the chunk |
| `[contenthash]` | Hash of content for a specific file type. For example JavaScript files only hash JS modules in the chunk |
### Module placeholders
Module placeholders expose information about a specific module.
| Template | Description |
| --------------- | ---------------------- |
| `[id]` | Module ID |
| `[hash]` | Module hash |
| `[contenthash]` | Hash of module content |
### File placeholders
File placeholders expose information derived from the file path.
| Template | Description |
| ------------ | ------------------------------------------------------------------------ |
| `[file]` | Full file path without query or fragment |
| `[query]` | The query string, including `?` |
| `[fragment]` | Fragment starting with `#` |
| `[base]` | Base filename including extension but without path |
| `[path]` | Directory path without the filename |
| `[name]` | Filename without extension and without path |
| `[ext]` | Extension including `.` (only supported in `output.assetModuleFilename`) |
Relationships:
- `[file]` equals `[path][base]`
- `[base]` equals `[name][ext]`
A complete path can be built using any of these forms:
- `[path][name][ext][query][fragment]`
- `[path][base][query][fragment]`
- `[file][query][fragment]`
### URL placeholders
URL placeholders expose information about the current request URL.
| Template | Description |
| -------- | ----------- |
| `[url]` | URL value |
## Hash Length
Hash placeholders (`[hash]`, `[contenthash]`, `[chunkhash]`) support length modifiers using `[hash:n]`, where the default length is 16.
Example truncating `[contenthash]` to 8 characters:
```js title="rspack.config.mjs"
const isProd = process.env.NODE_ENV === 'production';
export default {
output: {
filename: isProd ? '[name].[contenthash:8].js' : '[name].js',
},
};
```
You can also specify a digest (only `base64` is supported) and length:
```js title="rspack.config.mjs"
const isProd = process.env.NODE_ENV === 'production';
export default {
output: {
filename: isProd ? '[name].[contenthash:base64:8].js' : '[name].js',
},
};
```
Alternatively, you can configure a global default using [output.hashDigestLength](/config/output#outputhashdigestlength).
:::tip
During local development, avoid using hash-based filenames.
Entry chunks and chunks produced by [optimization.splitChunks](/plugins/webpack/split-chunks-plugin) are loaded via `
```
## output.cssChunkFilename
- **Type:** `string | (pathData: PathData, assetInfo?: AssetInfo) => string`
- **Default:** Determined by [`output.chunkFilename`](/config/output#outputchunkfilename) when it is not a function, otherwise `'[id].css'`.
This option determines the name of non-initial CSS output files on disk. See [`output.filename`](/config/output#outputfilename) option for details on the possible values.
You **must not** specify an absolute path here. However, feel free to include folders separated by `'/'`. This specified path combines with the [`output.path`](#outputpath) value to pinpoint the location on the disk.
## output.cssFilename
- **Type:** `string | (pathData: PathData, assetInfo?: AssetInfo) => string`
- **Default:** Determined by [`output.filename`](/config/output#outputfilename)
This option determines the name of CSS output files on disk. See [`output.filename`](/config/output#outputfilename) option for details on the possible values.
You **must not** specify an absolute path here. However, feel free to include folders separated by `'/'`. This specified path combines with the [`output.path`](#outputpath) value to pinpoint the location on the disk.
## output.devtoolFallbackModuleFilenameTemplate
- **Type:**
```ts
type DevtoolFallbackModuleFilenameTemplate =
| string
| ((context: ModuleFilenameTemplateContext) => string);
```
- **Default:** `undefined`
A fallback is used when the template string or function above yields duplicates.
See [`output.devtoolModuleFilenameTemplate`](/config/output#outputdevtoolmodulefilenametemplate).
## output.devtoolModuleFilenameTemplate
- **Type:**
```ts
type DevtoolModuleFilenameTemplate =
| string
| ((context: ModuleFilenameTemplateContext) => string);
```
- **Default:** `webpack://[namespace]/[resource-path]?[loaders]'`
This option is only used when [`devtool`](/config/devtool.html) uses an option that requires module names.
Customize the names used in each source map's `sources` array. This can be done by passing a template string or function. For example, when using `devtool: 'eval'`.
```js title="rspack.config.mjs"
export default {
//...
output: {
devtoolModuleFilenameTemplate:
'webpack://[namespace]/[resource-path]?[loaders]',
},
};
```
The following substitutions are available in template strings
| Template | Description |
| ------------------------ | --------------------------------------------------------------------------------------------------- |
| [absolute-resource-path] | The absolute filename |
| [relative-resource-path] | Resource path relative to the source map file’s directory (inline source maps are not supported) |
| [all-loaders] | Automatic and explicit loaders and params up to the name of the first loader |
| [hash] | The hash of the module identifier |
| [id] | The module identifier |
| [loaders] | Explicit loaders and params up to the name of the first loader |
| [resource] | The path used to resolve the file and any query params used on the first loader |
| [resource-path] | The path used to resolve the file without any query params |
| [namespace] | The modules namespace. This is usually the library name when building as a library, empty otherwise |
When using a function, the same options are available camel-cased via the `info` parameter:
```js title="rspack.config.mjs"
export default {
//...
output: {
devtoolModuleFilenameTemplate: (info) => {
return `webpack:///${info.resourcePath}?${info.loaders}`;
},
},
};
```
If multiple modules would result in the same name, [`output.devtoolFallbackModuleFilenameTemplate`](#outputdevtoolfallbackmodulefilenametemplate) is used instead for these modules.
## output.devtoolNamespace
- **Type:** `string`
- **Default:** `undefined`
This option determines the module's namespace used with the [`output.devtoolModuleFilenameTemplate`](#outputdevtoolmodulefilenametemplate). When not specified, it will default to the value of: [`output.uniqueName`](#outputuniquename). It's used to prevent source file path collisions in sourcemaps when loading multiple libraries built with Rspack.
For example, if you have 2 libraries, with namespaces `library1` and `library2`, which both have a file `./src/index.js` (with potentially different contents), they will expose these files as `webpack://library1/./src/index.js` and `webpack://library2/./src/index.js`.
## output.enabledChunkLoadingTypes
- **Type:** `('jsonp' | 'import-scripts' | 'require' | 'async-node' | string)[]`
- **Default:** Determined by [`output.chunkLoading`](#outputchunkloading), [`output.workerChunkLoading`](#outputworkerchunkloading) and Entry's chunkLoading config.
List of chunk loading types enabled for use by entry points. Will be automatically filled by Rspack. Only needed when using a function as entry option and returning chunkLoading option from there.
```js title="rspack.config.mjs"
export default {
//...
output: {
enabledChunkLoadingTypes: ['jsonp', 'require'],
},
};
```
## output.enabledLibraryTypes
- **Type:** `string[]`
- **Default:** Determined by [output.library](#outputlibrary) and [Entry](/config/entry)
List of library types enabled for use by entry points.
```js title="rspack.config.mjs"
export default {
//...
output: {
enabledLibraryTypes: ['module'],
},
};
```
## output.enabledWasmLoadingTypes
- **Type:** `('fetch-streaming' | 'fetch' | 'async-node' | string | false)[]`
- **Default:** Determined by [`output.wasmLoading`](#outputwasmloading) and [`output.workerWasmLoading`](#workerWasmLoading)
List of Wasm loading types enabled for use by entry points.
```js title="rspack.config.mjs"
export default {
//...
output: {
enabledWasmLoadingTypes: ['fetch'],
},
};
```
## output.environment
- **Type:**
```ts
type Environment = {
/** The environment supports arrow functions ('() => { ... }'). */
arrowFunction?: boolean;
/** The environment supports async function and await ('async function () { await ... }'). */
asyncFunction?: boolean;
/** The environment supports BigInt as literal (123n). */
bigIntLiteral?: boolean;
/** The environment supports const and let for variable declarations. */
const?: boolean;
/** The environment supports destructuring ('{ a, b } = obj'). */
destructuring?: boolean;
/** The environment supports 'document' variable. */
document?: boolean;
/** The environment supports an async import() function to import EcmaScript modules. */
dynamicImport?: boolean;
/** The environment supports an async import() when creating a worker, only for web targets at the moment. */
dynamicImportInWorker?: boolean;
/** The environment supports `import.meta.dirname` and `import.meta.filename`. */
importMetaDirnameAndFilename?: boolean;
/** The environment supports 'for of' iteration ('for (const x of array) { ... }'). */
forOf?: boolean;
/** The environment supports 'globalThis'. */
globalThis?: boolean;
/** The environment supports { fn() {} } */
methodShorthand?: boolean;
/** The environment supports ECMAScript Module syntax to import ECMAScript modules (import ... from '...'). */
module?: boolean;
/**
* Determines if the node: prefix is generated for core module imports in environments that support it.
* This is only applicable to Webpack runtime code.
* */
nodePrefixForCoreModules?: boolean;
/** The environment supports optional chaining ('obj?.a' or 'obj?.()'). */
optionalChaining?: boolean;
/** The environment supports template literals. */
templateLiteral?: boolean;
};
```
`output.environment` specifies which ECMAScript language features and host environment capabilities Rspack is allowed to use when generating its runtime code.
This setting affects only code emitted by Rspack itself, such as runtime helpers. It does not downgrade your application source code.
### Default behavior
By default, `output.environment` is automatically inferred from your [target](/config/target) configuration.
Rspack evaluates `target` to determine which features your target environment supports. For example:
- If the target browsers support arrow functions, Rspack will use arrow functions in the runtime to produce more compact output.
- If `target` specifies a particular Node.js version, Rspack will infer the supported syntax from that version’s capabilities.
In general, you do not need to configure this option manually. You would override it only when you want to explicitly enforce or restrict specific features. Manual configuration replaces the inferred values and gives you direct control over the syntax used in the generated runtime.
### Example
Suppose `target` is set to `['web', 'es2018']`. In this case, Rspack will infer that `const` is supported and enable it by default. You can disable it by setting `output.environment.const: false`. Rspack will then emit runtime code that uses `var` declarations instead.
```js title="rspack.config.mjs"
export default {
target: ['web', 'es2018'],
output: {
environment: {
const: false,
},
},
};
```
## output.filename
- **Type:** `string | (pathData: PathData, assetInfo?: AssetInfo) => string`
- **Default:** When [`output.module`](#outputmodule) is `true`, it is `'[name].mjs'`, otherwise it is `'[name].js'`.
This option determines the name of each output bundle. The bundle is written to the directory specified by the [`output.path`](#outputpath) option.
For a single [`entry`](/config/entry.html) point, this can be a static name.
```js title="rspack.config.mjs"
export default {
output: {
filename: 'bundle.js',
},
};
```
However, when creating multiple bundles via more than one entry point, code splitting, or various plugins, you should use one of the following substitutions to give each bundle a unique name...
:::info Description of other cases where multiple bundles can be split
Rspack performs code splitting optimizations on user input code, which may include, but are not limited to, code splitting, bundle splitting, or splitting implemented through other plugins. These splitting actions can result in multiple bundles being generated, so the filenames of the bundles need to be generated dynamically.
{
// TODO: add the Glossary link
}
:::
Use [Entry](/config/entry.html) name:
```js title="rspack.config.mjs"
export default {
//...
output: {
filename: '[name].bundle.js',
},
};
```
Using internal chunk id:
```js title="rspack.config.mjs"
export default {
//...
output: {
filename: '[id].bundle.js',
},
};
```
Using hashes generated from the generated content:
```js title="rspack.config.mjs"
export default {
//...
output: {
filename: '[contenthash].bundle.js',
},
};
```
Combining multiple substitutions:
```js title="rspack.config.mjs"
export default {
//...
output: {
filename: '[name].[contenthash].bundle.js',
},
};
```
:::tip
See [Filename placeholders](/config/filename-placeholders) for more information.
:::
Using the function to return the filename:
```js title="rspack.config.mjs"
export default {
//...
output: {
filename: (pathData) => {
return pathData.chunk.name === 'main' ? '[name].js' : '[name]/[name].js';
},
},
};
```
Note this option is called filename but you are still allowed to use something like `'js/[name]/bundle.js'` to create a folder structure.
Note this option does not affect output files for on-demand-loaded chunks. It only affects output files that are initially loaded. For on-demand-loaded chunk files, the [`output.chunkFilename`](#outputchunkfilename) option is used. Files created by loaders also aren't affected. In this case, you would have to try the specific loader's available options.
## output.globalObject
- **Type:** `string`
- **Default:** `'self'`
When targeting a library, especially when `library.type` is `'umd'`, this option indicates what global object will be used to mount the library. To make UMD build available on both browsers and Node.js, set `output.globalObject` option to `'this'`. Defaults to `self` for Web-like targets.
The return value of your entry point will be assigned to the global object using the value of `output.library.name`. Depending on the value of the `type` option, the global object could change respectively, e.g., `self`, `global`, or `globalThis`.
For example:
```js title="rspack.config.mjs"
export default {
output: {
library: 'myLib',
libraryTarget: 'umd',
filename: 'myLib.js',
globalObject: 'this',
},
};
```
## output.hashDigest
- **Type:** `string`
- **Default:** `'hex'`
The encoding to use when generating the hash. Using `'base64'` for filenames might be problematic since it has the character `/` in its alphabet. Likewise `'latin1'` could contain any character.
## output.hashDigestLength
- **Type:** `number`
- **Default:** `16`
The prefix length of the hash digest to use, see [Hash length](/config/filename-placeholders#hash-length) for more details.
```js title="rspack.config.mjs"
export default {
output: {
hashDigestLength: 8,
},
};
```
## output.hashFunction
- **Type:** `'md4' | 'xxhash64' | 'sha256'`
- **Default:** `'xxhash64'`
The hashing algorithm to use.
```js title="rspack.config.mjs"
export default {
output: {
hashFunction: 'xxhash64',
},
};
```
:::tip
Rspack uses the faster `xxhash64` algorithm by default since v1.1.
:::
## output.hashSalt
- **Type:** `string`
- **Default:** `undefined`
An optional salt to update the hash.
## output.hotUpdateChunkFilename
- **Type:** `string`
- **Default:** `"[id].[fullhash].hot-update.js"`
Customize the filenames of hot update chunks. See [`output.filename`](#outputfilename) option for details on the possible values.
The only placeholders allowed here are `[id]` and `[fullhash]`, the default being:
```js title="rspack.config.mjs"
export default {
output: {
hotUpdateChunkFilename: '[id].[fullhash].hot-update.js',
},
};
```
:::tip
Typically you don't need to change `output.hotUpdateChunkFilename`.
:::
## output.hotUpdateGlobal
- **Type:** `string`
- **Default:** `"webpackHotUpdate" + output.uniqueName`
Only used when [`target`](/config/target) is set to `'web'`, which uses JSONP for loading hot updates.
A JSONP function is used to asynchronously load hot-update chunks.
For details see [`output.chunkLoadingGlobal`](#outputchunkloadingglobal).
## output.hotUpdateMainFilename
- **Type:** `string`
- **Default:** `"[runtime].[fullhash].hot-update.json"`
Customize the main hot update filename. `[fullhash]` and `[runtime]` are available as placeholder.
:::tip
Typically you don't need to change `output.hotUpdateMainFilename`.
:::
## output.iife
- **Type:** `boolean`
- **Default:** `true`
Tells Rspack to add [IIFE](https://developer.mozilla.org/en-US/docs/Glossary/IIFE) wrapper around emitted code.
```js title="rspack.config.mjs"
export default {
output: {
iife: true,
},
};
```
## output.importFunctionName
- **Type:** `string`
- **Default:** `'import'`
The name of the native `import()` function. Can be used for polyfilling, e.g. with [`dynamic-import-polyfill`](https://github.com/GoogleChromeLabs/dynamic-import-polyfill).
```js title="rspack.config.mjs"
export default {
//...
output: {
importFunctionName: '__import__',
},
};
```
## output.importMetaName
- **Type:** `string`
- **Default:** `'import.meta'`
The name of the native `import.meta` object (can be exchanged for a polyfill).
```js title="rspack.config.mjs"
export default {
//...
output: {
importMetaName: 'pseudoImport.meta',
},
};
```
## output.library
Output a library exposing the exports of your entry point.
- **Type:** `string | string[] | object`
Let's take a look at an example.
```js title="rspack.config.mjs"
export default {
// …
entry: './src/index.js',
output: {
library: 'MyLibrary',
},
};
```
Say you have exported a function in your `src/index.js` entry:
```js
export function hello(name) {
console.log(`hello ${name}`);
}
```
Now the variable `MyLibrary` will be bound with the exports of your entry file, and here's how to consume the Rspack bundled library:
```html
```
In the above example, we're passing a single entry file to `entry`, however, Rspack can accept [many kinds of entry point](/config/entry), e.g., an `array`, or an `object`.
1. If you provide an `array` as the `entry` point, only the last one in the array will be exposed.
```js title="rspack.config.mjs"
export default {
// …
entry: ['./src/a.js', './src/b.js'], // only exports in b.js will be exposed
output: {
library: 'MyLibrary',
},
};
```
2. If an `object` is provided as the `entry` point, all entries can be exposed using the `array` syntax of `library`:
```js title="rspack.config.mjs"
export default {
// …
entry: {
a: './src/a.js',
b: './src/b.js',
},
output: {
filename: '[name].js',
library: ['MyLibrary', '[name]'], // name is a placeholder here
},
};
```
Assuming that both `a.js` and `b.js` export a function `hello`, here's how to consume the libraries:
```html
```
### output.library.amdContainer
- **Type:** `string`
Use a container(defined in global space) for calling `define`/`require` functions in an AMD module.
:::warning
Note that the value of `amdContainer` **must be** set as a global variable.
:::
```js title="rspack.config.mjs"
export default {
// …
output: {
library: {
amdContainer: 'window["clientContainer"]',
type: 'amd', // or 'amd-require'
},
},
};
```
Which will result in the following bundle:
```js
window['clientContainer'].define(/*define args*/); // or 'amd-require' window['clientContainer'].require(/*require args*/);
```
### output.library.name
Specify a name for the library.
- **Type:** `string | string[] | {amd?: string, commonjs?: string, root?: string | string[]}`
```js title="rspack.config.mjs"
export default {
// …
output: {
library: {
name: 'MyLibrary',
},
},
};
```
### output.library.type
Configure how the library will be exposed.
- **Type:** `string`
Types included by default are `'var'`, `'module'`, `'system'`, `'assign'`, `'assign-properties'`, `'this'`, `'window'`, `'self'`, `'global'`, `'commonjs'`, `'commonjs2'`, `'commonjs-module'`, `'commonjs-static'`, `'amd'`, `'amd-require'`, `'umd'`, `'umd2'`, but others might be added by plugins.
For the following examples, we'll use `_entry_return_` to indicate the values returned by the entry point.
#### Expose a variable
These options assign the return value of the entry point (e.g. whatever the entry point exported) to the name provided by [`output.library.name`](#outputlibraryname) at whatever scope the bundle was included at.
##### type: 'var'
```js title="rspack.config.mjs"
export default {
// …
output: {
library: {
name: 'MyLibrary',
type: 'var',
},
},
};
```
When your library is loaded, the **return value of your entry point** will be assigned to a variable:
```js
var MyLibrary = _entry_return_;
// In a separate script with `MyLibrary` loaded…
MyLibrary.doSomething();
```
##### type: 'assign'
```js title="rspack.config.mjs"
export default {
// …
output: {
library: {
name: 'MyLibrary',
type: 'assign',
},
},
};
```
This will generate an implied global which has the potential to reassign an existing value (use with caution):
```js
MyLibrary = _entry_return_;
```
Be aware that if `MyLibrary` isn't defined earlier your library will be set in global scope.
##### type: 'assign-properties'
```js title="rspack.config.mjs"
export default {
// …
output: {
library: {
name: 'MyLibrary',
type: 'assign-properties',
},
},
};
```
Similar to [`type: 'assign'`](#type-assign) but a safer option as it will reuse `MyLibrary` if it already exists:
```js
// only create MyLibrary if it doesn't exist
MyLibrary = typeof MyLibrary === 'undefined' ? {} : MyLibrary;
// then copy the return value to MyLibrary
// similarly to what Object.assign does
// for instance, you export a `hello` function in your entry as follow
export function hello(name) {
console.log(`Hello ${name}`);
}
// In another script with MyLibrary loaded
// you can run `hello` function like so
MyLibrary.hello('World');
```
#### Expose via object assignment
These options assign the return value of the entry point (e.g. whatever the entry point exported) to a specific object under the name defined by [`output.library.name`](#outputlibraryname).
##### type: 'this'
```js title="rspack.config.mjs"
export default {
// …
output: {
library: {
name: 'MyLibrary',
type: 'this',
},
},
};
```
The **return value of your entry point** will be assigned to `this` under the property named by `output.library.name`. The meaning of `this` is up to you:
```js
this['MyLibrary'] = _entry_return_;
// In a separate script
this.MyLibrary.doSomething();
MyLibrary.doSomething(); // if `this` is window
```
##### type: 'window'
```js title="rspack.config.mjs"
export default {
// …
output: {
library: {
name: 'MyLibrary',
type: 'window',
},
},
};
```
The **return value of your entry point** will be assigned to the `window` object using the `output.library.name` value.
```js
window['MyLibrary'] = _entry_return_;
window.MyLibrary.doSomething();
```
##### type: 'global'
```js title="rspack.config.mjs"
export default {
// …
output: {
library: {
name: 'MyLibrary',
type: 'global',
},
},
};
```
The **return value of your entry point** will be assigned to the global object using the `output.library.name` value. Depending on the [`target`](/config/target) value, the global object could change respectively, e.g., `self`, `global` or `globalThis`.
```js
global['MyLibrary'] = _entry_return_;
global.MyLibrary.doSomething();
```
##### type: 'commonjs'
```js title="rspack.config.mjs"
export default {
// …
output: {
library: {
name: 'MyLibrary',
type: 'commonjs',
},
},
};
```
The **return value of your entry point** will be assigned to the `exports` object using the `output.library.name` value. As the name implies, this is used in CommonJS environments.
```js
exports['MyLibrary'] = _entry_return_;
require('MyLibrary').doSomething();
```
:::warning
Note that not setting a `output.library.name` will cause all properties returned by the entry point to be assigned to the given object; there are no checks against existing property names.
:::
#### Module definition systems
These options will result in a bundle that comes with a complete header to ensure compatibility with various module systems. The `output.library.name` option will take on a different meaning under the following `output.library.type` options.
##### type: 'module'
```js title="rspack.config.mjs"
export default {
// …
experiments: {
outputModule: true,
},
output: {
library: {
// do not specify a `name` here
type: 'module',
},
},
};
```
Output ES modules.
However this feature is still experimental and not fully supported yet, so make sure to enable [`experiments.outputModule`](/config/experiments#experimentsoutputmodule) beforehand. In addition, you can track the development progress in [this thread](https://github.com/webpack/webpack/issues/2933#issuecomment-774253975).
##### type: 'modern-module'
```js title="rspack.config.mjs"
export default {
// …
experiments: {
outputModule: true,
},
output: {
library: {
// do not specify a `name` here
type: 'modern-module',
},
},
};
```
This configuration generates tree-shakable output for ES Modules.
However this feature is still experimental and not fully supported yet, so make sure to enable [`experiments.outputModule`](/config/experiments#experimentsoutputmodule) beforehand.
##### type: 'commonjs2'
```js title="rspack.config.mjs"
export default {
// …
output: {
library: {
// note there's no `name` here
type: 'commonjs2',
},
},
};
```
The **return value of your entry point** will be assigned to the `module.exports`. As the name implies, this is used in Node.js (CommonJS) environments:
```js
module.exports = _entry_return_;
require('MyLibrary').doSomething();
```
If we specify `output.library.name` with `type: commmonjs2`, the return value of your entry point will be assigned to the `module.exports.[output.library.name]`.
:::tip
Wondering the difference between CommonJS and CommonJS2 is? While they are similar, there are some subtle differences between them that are not usually relevant in the context of Rspack. (For further details, please [read this issue](https://github.com/webpack/webpack/issues/1114).)
:::
##### type: 'commonjs-static'
```js title="rspack.config.mjs"
export default {
// …
output: {
library: {
// note there's no `name` here
type: 'commonjs-static',
},
},
};
```
Individual exports will be set as properties on `module.exports`. The "static" in the name refers to the output being statically analysable, and thus named exports are importable into ESM via Node.js:
Input:
```js
export function doSomething() {}
```
Output:
```js
function doSomething() {}
// …
exports.doSomething = __webpack_exports__.doSomething;
```
Consumption (CommonJS):
```js
const { doSomething } = require('./output.cjs'); // doSomething => [Function: doSomething]
```
Consumption (ESM):
```js
import { doSomething } from './output.cjs'; // doSomething => [Function: doSomething]
```
:::tip
This is useful when source code is written in ESM and the output should be compatible with both CJS and ESM. For further details, please [read this issue](https://github.com/webpack/webpack/issues/14998) or [this article](https://dev.to/jakobjingleheimer/configuring-commonjs-es-modules-for-nodejs-12ed) (specifically, [this section](https://dev.to/jakobjingleheimer/configuring-commonjs-es-modules-for-nodejs-12ed#publish-only-a-cjs-distribution-with-property-exports)).
:::
##### type: 'amd'
This will expose your library as an AMD module.
AMD modules require that the entry chunk (e.g. the first script loaded by the `
```
```js title="rspack.config.mjs"
export default {
//...
externals: {
jquery: 'jquery',
},
};
```
This leaves any dependent modules unchanged, i.e. the code shown below will still work:
```js
import $ from 'jquery';
$('.my-element').animate(/* ... */);
```
The property name `jquery` specified under `externals` in the above Rspack configuration indicates that the module `jquery` in `import $ from 'jquery'` should be excluded from bundling. In order to replace this module, the value `jQuery` will be used to retrieve a global `jQuery` variable, as the default external library type is `var`, see [externalsType](#externalstype).
While we showed an example consuming external global variable above, the external can actually be available in any of these forms: global variable, CommonJS, AMD, ES2015 Module, see more in [externalsType](#externalstype).
### string
Depending on the [externalsType](#externalstype), this could be the name of the global variable (see [`'global'`](#externalstypeglobal), [`'this'`](#externalstypethis), [`'var'`](#externalstypevar), [`'window'`](#externalstypewindow)) or the name of the module (see `amd`, [`commonjs`](#externalstypecommonjs), [`module`](#externalstypemodule), `umd`).
You can also use the shortcut syntax if you're defining only 1 external:
```js title="rspack.config.mjs"
export default {
//...
externals: 'jquery',
};
```
equals to
```js title="rspack.config.mjs"
export default {
//...
externals: {
jquery: 'jquery',
},
};
```
You can specify the [external library type](#externalstype) to the external with the `${externalsType} ${libraryName}` syntax. It will override the default external library type specified in the [externalsType](#externalstype) option.
For example, if the external library is a [CommonJS module](#externalstypecommonjs), you can specify
```js title="rspack.config.mjs"
export default {
//...
externals: {
jquery: 'commonjs jquery',
},
};
```
### string[]\{#string-array}
```js title="rspack.config.mjs"
export default {
//...
externals: {
subtract: ['./math', 'subtract'],
},
};
```
`subtract: ['./math', 'subtract']` allows you select part of a module, where `./math` is the module and your bundle only requires the subset under the `subtract` variable.
When the `externalsType` is `commonjs`, this example would translate to `require('./math').subtract;` while when the `externalsType` is `window`, this example would translate to `window["./math"]["subtract"];`
Similar to the [string syntax](#string), you can specify the external library type with the `${externalsType} ${libraryName}` syntax, in the first item of the array, for example:
```js title="rspack.config.mjs"
export default {
//...
externals: {
subtract: ['commonjs ./math', 'subtract'],
},
};
```
### object
:::warning
An object with `{ root, commonjs, commonjs2, amd, ... }` is only allowed for [`libraryTarget: 'umd'`](/config/output#outputlibrarytarget) and [`externalsType: 'umd'`](#externalstype). It's not allowed for other library targets.
:::
```js title="rspack.config.mjs"
export default {
externals: {
// When `libraryTarget: 'umd'` and `externalsType: 'umd'`, the following format must be strictly followed:
lodash: {
root: '_', // indicates global variable
commonjs: 'lodash',
commonjs2: 'lodash',
amd: 'lodash',
},
},
};
```
This syntax is used to describe all the possible ways that an external library can be made available. `lodash` here is available as `lodash` under AMD and CommonJS module systems but available as `_` in a global variable form. `subtract` here is available via the property `subtract` under the global `math` object (e.g. `window['math']['subtract']`).
### function
- **Type:**
- `function ({ context, request, contextInfo, getResolve }, callback)`
- `function ({ context, request, contextInfo, getResolve }) => promise`
It might be useful to define your own function to control the behavior of what you want to externalize from Rspack. [webpack-node-externals](https://www.npmjs.com/package/webpack-node-externals), for example, excludes all modules from the `node_modules` directory and provides options to allowlist packages.
Here're arguments the function can receive:
- `ctx` (`object`): Object containing details of the file.
- `ctx.context` (`string`): The directory of the file which contains the import.
- `ctx.request` (`string`): The import path being requested.
- `ctx.contextInfo` (`object`): Contains information about the issuer (e.g. the layer and compiler)
- `ctx.getResolve`: Get a resolve function with the current resolver options.
- `callback` (`function (err, result, type)`): Callback function used to indicate how the module should be externalized.
The callback function takes three arguments:
- `err` (`Error`): Used to indicate if there has been an error while externalizing the import. If there is an error, this should be the only parameter used.
- `result` (`string | string[] | object`): Describes the external module with the other external formats ([`string`](#string), [`string[]`](#string-array), or [`object`](#object))
- `type` (`string`): Optional parameter that indicates the module [external type](#externalstype) (if it has not already been indicated in the `result` parameter).
As an example, to externalize all imports where the import path matches a regular expression you could do the following:
```js title="rspack.config.mjs"
export default {
//...
externals: [
function ({ context, request }, callback) {
if (/^yourregex$/.test(request)) {
// Externalize to a commonjs module using the request path
return callback(null, 'commonjs ' + request);
}
// Continue without externalizing the import
callback();
},
],
};
```
Other examples using different module formats:
```js title="rspack.config.mjs"
export default {
externals: [
function (ctx, callback) {
// The external is a `commonjs2` module located in `@scope/library`
callback(null, '@scope/library', 'commonjs2');
},
],
};
```
```js title="rspack.config.mjs"
export default {
externals: [
function (ctx, callback) {
// The external is a global variable called `nameOfGlobal`.
callback(null, 'nameOfGlobal');
},
],
};
```
```js title="rspack.config.mjs"
export default {
externals: [
function (ctx, callback) {
// The external is a named export in the `@scope/library` module.
callback(null, ['@scope/library', 'namedexport'], 'commonjs');
},
],
};
```
```js title="rspack.config.mjs"
export default {
externals: [
function (ctx, callback) {
// The external is a UMD module
callback(null, {
root: 'componentsGlobal',
commonjs: '@scope/components',
commonjs2: '@scope/components',
amd: 'components',
});
},
],
};
```
### RegExp
Every dependency that matches the given regular expression will be excluded from the output bundles.
```js title="rspack.config.mjs"
export default {
//...
externals: /^(jquery|\$)$/i,
};
```
In this case, any dependency named `jQuery`, capitalized or not, or `$` would be externalized.
### Combining syntaxes
Sometimes you may want to use a combination of the above syntaxes. This can be done in the following manner:
```js title="rspack.config.mjs"
export default {
//...
externals: [
{
// String
react: 'react',
// Object
lodash: {
commonjs: 'lodash',
amd: 'lodash',
root: '_', // indicates global variable
},
// [string]
subtract: ['./math', 'subtract'],
},
// Function
function ({ context, request }, callback) {
if (/^yourregex$/.test(request)) {
return callback(null, 'commonjs ' + request);
}
callback();
},
// Regex
/^(jquery|\$)$/i,
],
};
```
:::warning
[Default type](#externalstype) will be used if you specify `externals` without a type e.g. `externals: { react: 'react' }` instead of `externals: { react: 'commonjs-module react' }`.
:::
## externalsType
- **Type:** `string`
- **Default:** `'var'`
Specify the default type of externals. `amd`, `umd`, `system` and `jsonp` externals **depend on the [`output.libraryTarget`](/config/output#outputlibrarytarget)** being set to the same value e.g. you can only consume `amd` externals within an `amd` library.
Supported types:
- `'amd'`
- `'amd-require'`
- `'assign'` - same as `'var'`
- [`'commonjs'`](#externalstypecommonjs)
- `'commonjs-module'`
- [`'global'`](#externalstypeglobal)
- [`'module'`](#externalstypemodule)
- [`'import'`](#externalstypeimport) - uses `import()` to load a native ECMAScript module (async module)
- [`'module-import'`](#externalstypemodule-import)
- [`'commonjs-import'`](#externalstypecommonjs-import)
- `'jsonp'`
- [`'node-commonjs'`](#externalstypenode-commonjs)
- [`'promise'`](#externalstypepromise) - same as `'var'` but awaits the result (async module)
- [`'self'`](#externalstypeself)
- `'system'`
- [`'script'`](#externalstypescript)
- [`'this'`](#externalstypethis)
- `'umd'`
- `'umd2'`
- [`'var'`](#externalstypevar)
- [`'window'`](#externalstypewindow)
```js title="rspack.config.mjs"
export default {
//...
externalsType: 'promise',
};
```
### externalsType.commonjs
Specify the default type of externals as `'commonjs'`. Rspack will generate code like `const X = require('...')` for externals used in a module.
**Example**
```js
import fs from 'fs-extra';
```
```js title="rspack.config.mjs"
export default {
externalsType: 'commonjs',
externals: {
'fs-extra': 'fs-extra',
},
};
```
Will generate into something like:
```js
const fs = require('fs-extra');
```
Note that there will be a `require()` in the output bundle.
### externalsType.global
Specify the default type of externals as `'global'`. Rspack will read the external as a global variable on the [`globalObject`](/config/output#outputglobalobject).
**Example**
```js
import jq from 'jquery';
jq('.my-element').animate(/* ... */);
```
```js title="rspack.config.mjs"
export default {
externalsType: 'global',
externals: {
jquery: '$',
},
output: {
globalObject: 'global',
},
};
```
Will generate into something like
```js
const jq = global['$'];
jq('.my-element').animate(/* ... */);
```
### externalsType.module
Specify the default type of externals as `'module'`. Rspack will generate code like `import * as X from '...'` for externals used in a module.
Make sure to enable [`experiments.outputModule`](/config/experiments#experimentsoutputmodule) first, otherwise Rspack will throw errors.
**Example**
```js
import jq from 'jquery';
jq('.my-element').animate(/* ... */);
```
```js title="rspack.config.mjs"
export default {
experiments: {
outputModule: true,
},
externalsType: 'module',
externals: {
jquery: 'jquery',
},
};
```
Will generate into something like
```js
import * as __rspack_external_jquery from 'jquery';
const jq = __rspack_external_jquery['default'];
jq('.my-element').animate(/* ... */);
```
Note that there will be an `import` statement in the output bundle.
### externalsType.import
Specify the default type of externals as `'import'`. Rspack will generate code like `import('...')` for externals used in a module.
**Example**
```js
async function foo() {
const jq = await import('jquery');
jq('.my-element').animate(/* ... */);
}
```
```js title="rspack.config.mjs"
export default {
externalsType: 'import',
externals: {
jquery: 'jquery',
},
};
```
Will generate into something like
```js
var __webpack_modules__ = {
jquery: (module) => {
module.exports = import('jquery');
},
};
// webpack runtime...
async function foo() {
const jq = await Promise.resolve(/* import() */).then(
__webpack_require__.bind(__webpack_require__, 'jquery'),
);
jq('.my-element').animate(/* ... */);
}
```
Note that there will be an `import()` statement in the output bundle.
### externalsType['module-import']
Specify the default type of externals as `'module-import'`. This combines [`'module'`](#externalstypemodule) and [`'import'`](#externalstypeimport). Rspack will automatically detect the type of import syntax, setting it to `'module'` for static imports and `'import'` for dynamic imports.
Make sure to enable [`experiments.outputModule`](/config/#experimentsoutputmodule) first if static imports exist, otherwise Rspack will throw errors.
**Example**
```js
import { attempt } from 'lodash';
async function foo() {
const jq = await import('jquery');
attempt(() => jq('.my-element').animate(/* ... */));
}
```
```js title="rspack.config.mjs"
export default {
externalsType: 'module-import',
externals: {
lodash: 'lodash',
jquery: 'jquery',
},
};
```
Will generate into something like
```js
import * as __rspack_external_lodash from 'lodash';
const lodash = __rspack_external_jquery;
var __webpack_modules__ = {
jquery: (module) => {
module.exports = import('jquery');
},
};
// webpack runtime...
async function foo() {
const jq = await Promise.resolve(/* import() */).then(
__webpack_require__.bind(__webpack_require__, 'jquery'),
);
(0, lodash.attempt)(() => jq('.my-element').animate(/* ... */));
}
```
Note that there will be an `import` or `import()` statement in the output bundle.
When a module is not imported via `import` or `import()`, Rspack will use `"module"` externals type as fallback. If you want to use a different type of externals as fallback, you can specify it with a function in the `externals` option. For example:
```js title="rspack.config.mjs"
export default {
externalsType: "module-import",
externals: [
function (
{ request, dependencyType },
callback
) {
if (dependencyType === "commonjs") {
return callback(null, `node-commonjs ${request}`);
}
callback();
},
]
```
### externalsType['commonjs-import']
Specify the default type of externals as `'commonjs-import'`. This combines [`'commonjs'`](#externalstypecommonjs) and [`'import'`](#externalstypeimport). Rspack will automatically detect the type of import syntax, setting dynamic import to `'import'` and leaving others to `'commonjs'`.
This is useful when building a Node.js application that target Node.js version higher than `13.2.0`, which supports both [`import()` expressions](https://nodejs.org/api/esm.html#import-expressions) and `require()`.
:::note
`commonjs-import` type is only available of Rspack, and not applicable for webpack.
:::
**Example**
```js
import { attempt } from 'lodash';
async function foo() {
const jq = await import('jquery');
attempt(() => jq('.my-element').animate(/* ... */));
}
```
```js title="rspack.config.mjs"
export default {
externalsType: 'commonjs-import',
externals: {
lodash: 'lodash',
jquery: 'jquery',
},
};
```
Will generate into something like
```js
var __webpack_modules__ = {
lodash: function (module) {
module.exports = require('lodash');
},
jquery: function (module) {
module.exports = import('jquery');
},
};
// Rspack runtime...
async function foo() {
const jq = await Promise.resolve(/* import() */).then(
__webpack_require__.bind(__webpack_require__, 'jquery'),
);
(0, lodash__rspack_import_0__.attempt)(() =>
jq('.my-element').animate(/* ... */),
);
}
```
Note that there will be an `import()` statement in the output bundle.
### externalsType['node-commonjs']
Specify the default type of externals as `'node-commonjs'`. Rspack will import [`createRequire`](https://nodejs.org/api/module.html#module_module_createrequire_filename) from `'module'` to construct a require function for loading externals used in a module.
**Example**
```js
import jq from 'jquery';
jq('.my-element').animate(/* ... */);
```
```js title="rspack.config.mjs"
export default {
experiments: {
outputModule: true,
},
externalsType: 'node-commonjs',
externals: {
jquery: 'jquery',
},
};
```
Will generate into something like
```js
import { createRequire } from 'module';
const jq = createRequire(import.meta.url)('jquery');
jq('.my-element').animate(/* ... */);
```
Note that there will be an `import` statement in the output bundle.
### externalsType.promise
Specify the default type of externals as `'promise'`. Rspack will read the external as a global variable (similar to [`'var'`](#externalstypepromise)) and `await` for it.
**Example**
```js
import jq from 'jquery';
jq('.my-element').animate(/* ... */);
```
```js title="rspack.config.mjs"
export default {
externalsType: 'promise',
externals: {
jquery: '$',
},
};
```
Will generate into something like
```js
const jq = await $;
jq('.my-element').animate(/* ... */);
```
### externalsType.self
Specify the default type of externals as `'self'`. Rspack will read the external as a global variable on the `self` object.
**Example**
```js
import jq from 'jquery';
jq('.my-element').animate(/* ... */);
```
```js title="rspack.config.mjs"
export default {
externalsType: 'self',
externals: {
jquery: '$',
},
};
```
Will generate into something like
```js
const jq = self['$'];
jq('.my-element').animate(/* ... */);
```
### externalsType.script
Specify the default type of externals as `'script'`. Rspack will load the external as a script exposing predefined global variables with HTML `
"
}
```
```html title="html"
Hello, <strong>Rspack</strong>.
Hello, Rspack.
Hello, </p><script>document.write()</script><p>.
Hello,
.
```
#### Control statements
Use the `for in` statement to implement list traversal and the `if` statement to implement conditional judgment:
```txt title="ejs"
<% for tag in htmlRspackPlugin.tags.headTags { %>
<% if tag.tagName=="script" { %>
<%= toHtml(tag) %>
<% } %>
<% } %>
```
## Usage
The plugin will generate an HTML file for you that includes all your JS outputs in the head using `
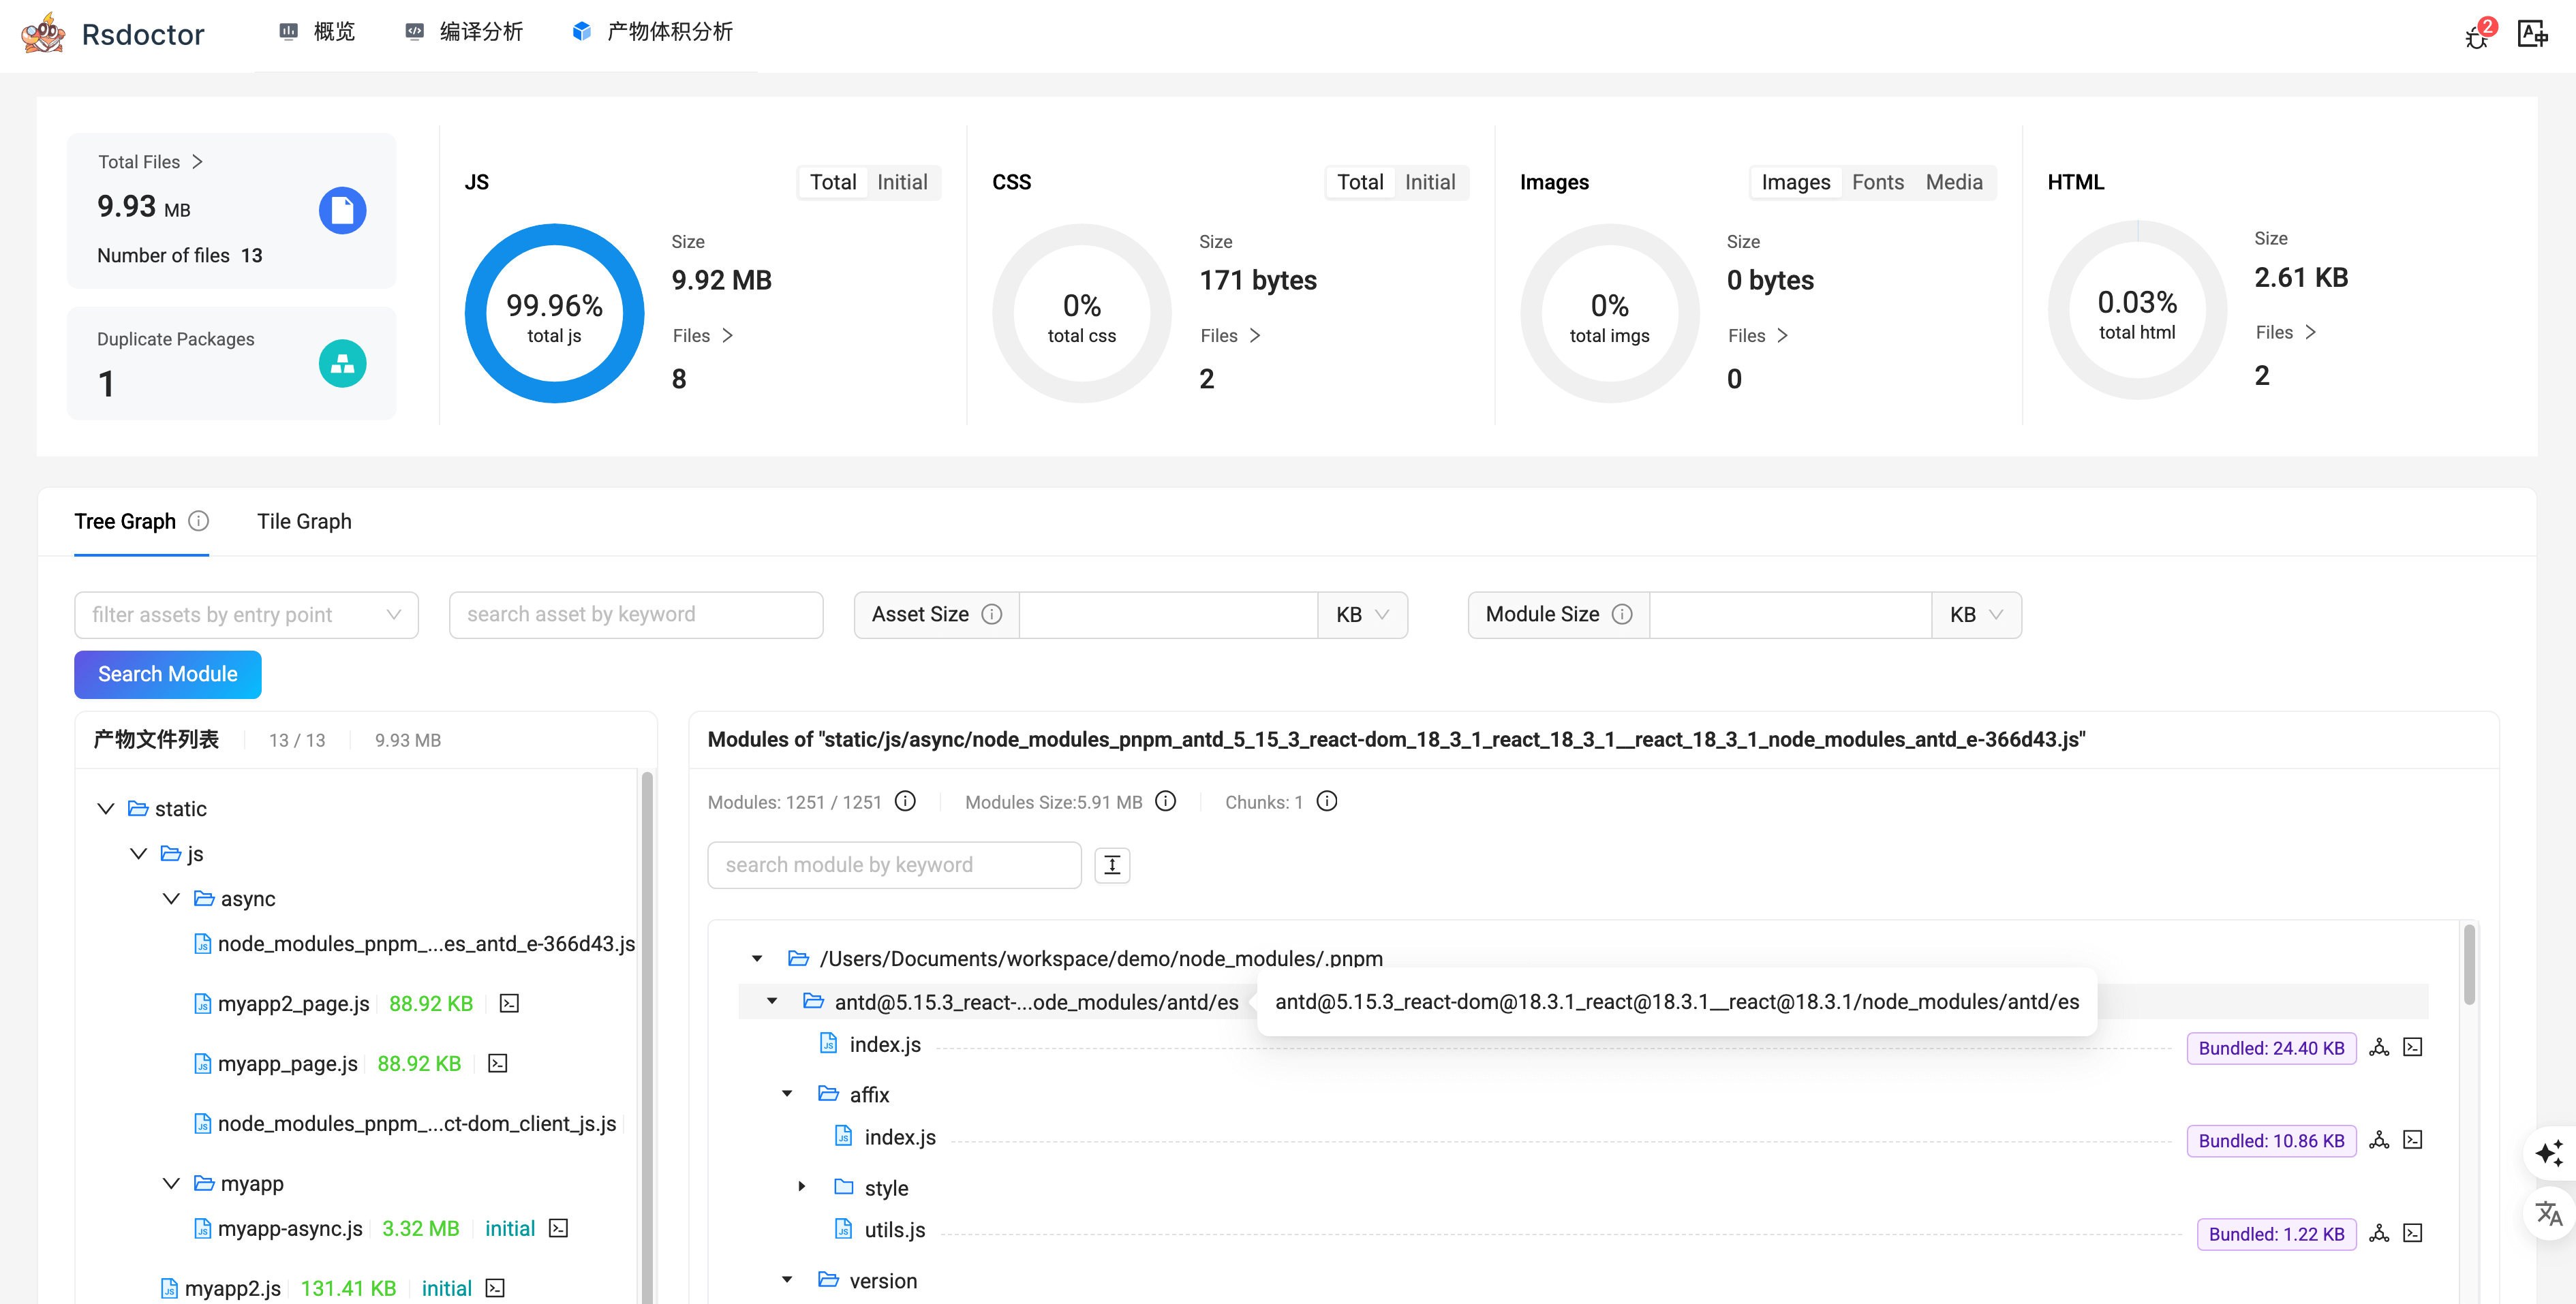 Click on the **"Bundle Size"** option in the navigation bar to view the Bundle analysis report. You can see more details from this page: [Bundle Size](https://rsdoctor.rs/guide/usage/bundle-size)
### Reduce duplicate dependencies
Bundle size optimization is an important part in production build because it directly affects the user experience of online users. In this document, we will introduce some common bundle size optimization methods in Rspack.
It is common for web projects to bundle multiple versions of third-party dependencies. Duplicate dependencies can lead to increased bundle size and slower build speed.
- Detect duplicate dependencies
You can use [Rsdoctor](https://rsdoctor.rs) to detect whether there are duplicate dependencies in the project. Rsdoctor will analyze during the build process, find any duplicate bundled dependencies and display them visually:

For more details, see [Rsdoctor - Duplicate Dependency Problem](https://rsdoctor.rs/blog/topic/duplicate-pkg-problem).
## webpack-bundle-analyzer
Rspack's Command Line Interface (CLI) supports bundle analysis out-of-box via the `--analyze` option. It uses [webpack-bundle-analyzer](https://www.npmjs.com/package/webpack-bundle-analyzer) behind the scenes.
```sh
$ rspack build --analyze
```
## bundle-stats and statoscope
You can also generate a `stats.json` file for further analysis with other bundle analysis tools like [bundle-stats](https://github.com/relative-ci/bundle-stats) or [statoscope](https://statoscope.tech/):
```sh
$ rspack build --json stats.json
```
---
url: /guide/optimization/code-splitting.md
---
import WebpackLicense from '@components/WebpackLicense';
Click on the **"Bundle Size"** option in the navigation bar to view the Bundle analysis report. You can see more details from this page: [Bundle Size](https://rsdoctor.rs/guide/usage/bundle-size)
### Reduce duplicate dependencies
Bundle size optimization is an important part in production build because it directly affects the user experience of online users. In this document, we will introduce some common bundle size optimization methods in Rspack.
It is common for web projects to bundle multiple versions of third-party dependencies. Duplicate dependencies can lead to increased bundle size and slower build speed.
- Detect duplicate dependencies
You can use [Rsdoctor](https://rsdoctor.rs) to detect whether there are duplicate dependencies in the project. Rsdoctor will analyze during the build process, find any duplicate bundled dependencies and display them visually:

For more details, see [Rsdoctor - Duplicate Dependency Problem](https://rsdoctor.rs/blog/topic/duplicate-pkg-problem).
## webpack-bundle-analyzer
Rspack's Command Line Interface (CLI) supports bundle analysis out-of-box via the `--analyze` option. It uses [webpack-bundle-analyzer](https://www.npmjs.com/package/webpack-bundle-analyzer) behind the scenes.
```sh
$ rspack build --analyze
```
## bundle-stats and statoscope
You can also generate a `stats.json` file for further analysis with other bundle analysis tools like [bundle-stats](https://github.com/relative-ci/bundle-stats) or [statoscope](https://statoscope.tech/):
```sh
$ rspack build --json stats.json
```
---
url: /guide/optimization/code-splitting.md
---
import WebpackLicense from '@components/WebpackLicense';